Design Cookbook: Motor Mounts
Cookbook Index
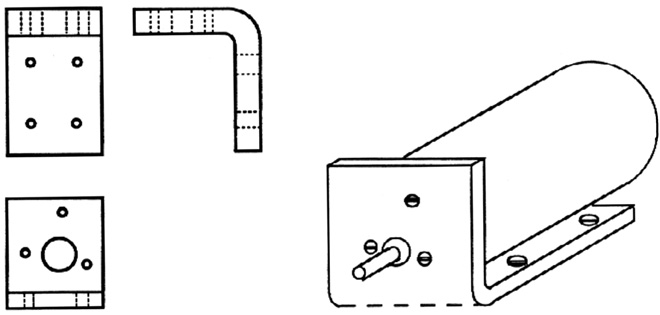
These mounts can be used to attach almost any motors to the body of a machine.
Materials:
- X Strip of Aluminum sheet material (X depends on number of motors to mount, basic starting size can be 50mm by 100mm)
- Motor template or connecting part
- 4 Screws to attach to machine
- N Screws to attach motor to mount (N depends on motor, screw heads must be small to not interfere with the gears)
Procedure:
- Think first! Use the template or motor parts to determine what direction the motor should be placed, where, size of material strip, etc. Factors to consider include room for power leads, bolt clearance, wheel diameter, and motor position in relation to the body ground and wheels should be taken into account. Note that the holes shown in the figure are NOT a template!
- Mark the position of the large hole which the shaft will pass through.
- Drill a hole through the aluminum sheet. If making multiple mounts, stack the individual sheets and secure them together using tape. Then drill all of the holes simultaneously.
- Using the template or part again, mark the position of the screw holes. Do not move the template while marking or else your holes will be incorrect.
- Using a clearance drill sized for the motor's bolts, drill the required number of holes. If making multiple mounts, drill through the complete stack for each hole. Check to see that the template matches the drilled holes.
- Using a clearance drill sized for the mounting bolts, drill the four holes for securing the mounts to the machine. If the mounting patterns are different, separate the sheets first.
- Considering the design from the first step, draw a bending line on strip. If making multiple mounts, separate the strips and copy the bending line onto each strip.
- Bend the strips. If possible, try to bend multiple mounts at the same time by placing them next to each other in the bender. This will ensure that the bends are at the same location.