This tutorial covers copy/paste, node editing, freehand and bezier drawing, path manipulation, booleans, offsets, simplification, and text tool.
Use Ctrl+arrows, mouse wheel, or middle button drag to scroll the page down. For basics of object creation, selection, and transformation, see the Basic tutorial in .
Pasting techniques
After you copy some object(s) by Ctrl+C or cut by Ctrl+X, the regular command (Ctrl+V) pastes the copied object(s) right under the mouse cursor or, if the cursor is outside the window, to the center of the document window. However, the object(s) in the clipboard still remember the original place from which they were copied, and you can paste back there by (Ctrl+Alt+V).
Yet another command, (Shift+Ctrl+V), applies the style of the (first) object on the clipboard to the current selection. The "style" thus pasted includes all the fill, stroke, and font settings, but not the shape, size, or parameters specific to a shape type, such as the number of tips of a star.
Note that Inkscape has its own internal clipboard; it does not use the system clipboard except for copying/pasting text by the Text tool.
Drawing freehand and regular paths
The easiest way to create an arbitrary shape is to draw it using the Pencil (freehand) tool (F6):
If you want more regular shapes, use the Pen (Bezier) tool (Shift+F6):
With the Pen tool, each click creates a sharp node without any curve handles, so a series of clicks produces a sequence of straight line segments. Click and drag creates a smooth Bezier node with two collinear opposite handles. Press Shift while dragging out a handle to rotate only one handle and fix the other. As usual, Ctrl limits the direction of either the current line segment or the Bezier handles to 15 degree increments. Pressing Enter finalizes the line, Esc cancels it. To cancel only the last segment of an unfinished line, press Backspace.
In both freehand and bezier tools, the currently selected path displays small square anchors at both ends. These anchors allow you to continue this path (by drawing from one of the anchors) or close it (by drawing from one anchor to the other) instead of creating a new one.
Editing paths
Unlike shapes created by shape tools, the Pen and Pencil tools create what is called paths. A path is a sequence of straight line segments and/or Bezier curves which, as any other Inkscape object, may have arbitrary fill and stroke properties. But unlike a shape, a path can be edited by freely dragging any of its nodes (and not just predefined handles). Select this path and switch to Node tool (F2):
You will see a number of gray square nodes on the path. These nodes can be selected by click, Shift+click, or by dragging a rubberband — exactly like objects are selected by the Selector tool. Selected nodes become highlighted and show their node handles — one or two small circles connected to each selected node by straight lines.
Paths are edited by dragging their nodes and node handles. (Try to drag some nodes and handles of the above path.) Ctrl works as usual to restrict movement and rotation. The arrow keys, Tab, [, ], <, > keys with their modifiers all work just as they do in selector, but apply to nodes instead of objects. You can delete (Del) or duplicate (Shift+D) selected nodes. The path can be broken (Shift+B) at the selected nodes, or if you select two endnodes on one path, you can join them (Shift+J).
A node can be made cusp (Shift+C), which means its two handles can move independently at any angle to each other; smooth (Shift+S), which means its handles are always on the same straight line (collinear); and symmetric (Shift+Y), which is the same as smooth, but the handles also have the same length.
Also, you can retract a node's handle altogether by Ctrl+clicking on it. If two adjacent nodes have their handles retracted, the path segment between them is a straight line. To pull out the retracted node, Shift+drag away from the node.
Subpaths and combining
A path object may contain more than one subpath. A subpath is a sequence of nodes connected to each other. (Therefore, if a path has more than one subpath, not all of its nodes are connected.) Below left, three subpaths belong to a single compound path; the same three subpaths on the right are independent path objects:
Note that a compound path is not the same as a group. It's a single object which is only selectable as a whole. If you select the left object above and switch to node tool, you will see nodes displayed on all three subpaths. On the right, you can only node-edit one path at a time.
Inkscape can paths into a compound path (Ctrl+K) and a compound path into separate paths (Shift+Ctrl+K). Try these commands on the above examples. Since an object can only have one fill and stroke, a new compound path gets the style of the first (lowest in z-order) object being combined.
When you combine overlapping paths with fill, usually the fill will disappear in the areas where the paths overlap:

This is the easiest way to create objects with holes in them. For more powerful path commands, see "Boolean operations" below.
Converting to path
Any shape or text object can be converted to path (Shift+Ctrl+C). This operation does not change the appearance of the object but removes all capabilities specific to its type (e.g. you can't round the corners of a rectangle or edit the text anymore); instead, you can now edit its nodes. Here are two stars — the left one is kept a shape and the right one is converted to path. Switch to node tool and compare their editability when selected:

Moreover, you can convert to a path ("outline") the stroke of any object. Below, the first object is the original path (no fill, black stroke), while the second one is the result of the Stroke to Path command (black fill, no stroke):

Boolean operations
The commands in the Path menu let you combine two or more objects using boolean operations:
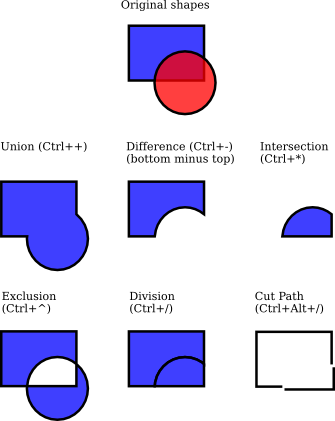
The keyboard shortcuts for these commands allude to the arithmetic analogs of the boolean operations (union is addition, difference is subtraction, etc.). The and commands can only apply to two selected objects; others may process any number of objects at once. The result always receives the style of the bottom object.
The result of the command looks similar to (see above), but it is different in that adds extra nodes where the original paths intersect. The difference between and is that the former cuts the entire bottom object by the path of the top object, while the latter only cuts the bottom object's stroke and removes any fill (this is convenient for cutting fill-less strokes into pieces).
Inset and outset
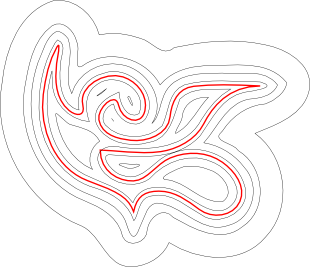
Inkscape can expand and contract shapes not only by scaling, but also by offsetting an object's path, i.e. by displacing it perpendicular to the path in each point. The corresponding commands are called (Ctrl+() and (Ctrl+)). Shown below is the original path (red) and a number of paths inset or outset from that original:
The plain and commands produce paths (converting the original object to path if it's not a path yet). Often, more convenient is the (Ctrl+J) which creates an object with a draggable handle (similar to a shape's handle) controlling the offset distance. Select the object below, switch to the node tool, and drag its handle to get an idea:
Such a dynamic offset object remembers the original path, so it does not "degrade" when you change the offset distance again and again. When you don't need it to be adjustable anymore, you can always convert an offset object back to path.
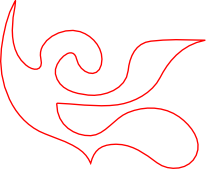
Still more convenient is a linked offset, which is similar to the dynamic variety but is connected to another path which remains editable. You can have any number of linked offsets for one source path. Below, the source path is red, one offset linked to it has black stroke and no fill, the other has black fill and no stroke.
Select the red object and node-edit it; watch how both linked offsets respond. Now select any of the offsets and drag its handle to adjust the offset radius. Finally, note how moving or transforming the source moves all offset objects linked to it, and how you can move or transform the offset objects independently without losing their connection with the source.
Simplification
The main use of the command (Ctrl+L) is reducing the number of nodes on a path while almost preserving its shape. This may be useful for paths created by the Pencil tool, since that tool sometimes creates more nodes than necessary. Below, the left shape is as created by the freehand tool, and the right one is a copy that was simplified. The original path has 28 nodes, while the simplified one has 17 (which means it is much easier to work with in node tool) and is smoother.
The amount of simplification (called the threshold) depends on the size of the selection. Therefore, if you select a path along with some larger object, it will be simplified more aggressively than if you select that path alone. Moreover, the command is accelerated. This means that if you press Ctrl+L several times in quick succession (so that the calls are within 0.5 sec from each other), the threshold is increased on each call. (If you do another Simplify after a pause, the threshold is back to its default value.) By making use of the acceleration, it is easy to apply the exact amount of simplification you need for each case.
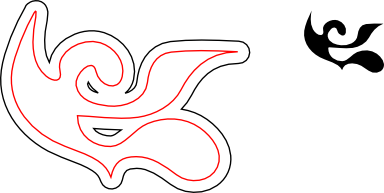
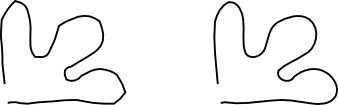
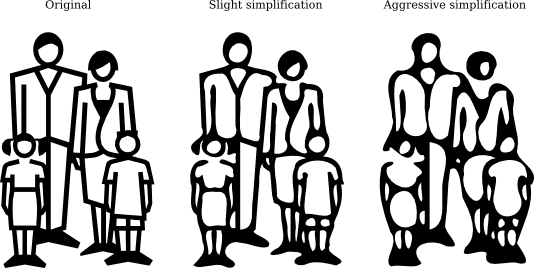
Besides smoothing freehand strokes, can be used for various creative effects. Often, a shape which is rigid and geometric benefits from some amount of simplification that creates cool life-like generalizations of the original form — melting sharp corners and introducing very natural distortions, sometimes stylish and sometimes plain funny. Here's an example of a clipart shape that looks much nicer after :
Creating text
Inkscape is capable of creating long and complex texts. However, it's also pretty convenient for creating small text objects such as heading, banners, logos, diagram labels and captions, etc. This section is a very basic introduiction into Inkscape's text capabilities.
Creating a text object is as simple as switching to the Text tool (F8), clicking somewhere in the document, and typing your text. To change font family, style, size, and alignment, open the Text and Font dialog (Shift+Ctrl+T). That dialog also has a text entry tab where you can edit the selected text object - in some situations, it may be more convenient than editing it right on the canvas (in particular, that tab supports as-you-type spell checking).
Like other tools, Text tool can select objects of its own type — text objects — so you can click to select and position the cursor in any existing text object (such as this paragraph).
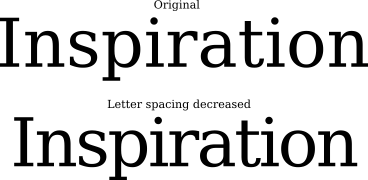
One of the most common operations in text design is adjusting spacing between letters and lines. As always, Inkscape provides keyboard shortcuts for this. When you are editing text, the Alt+< and Alt+> keys change the letter spacing in the current line of a text object, so that the total length of the line changes by 1 pixel at the current zoom (compare to Selector tool where the same keys do pixel-sized object scaling). As a rule, if the font size in a text object is larger than the default, it will likely benefit from squeezing letters a bit tighter than the default. Here's an example:
The tightened variant looks a bit better as a heading, but it's still not perfect: the distances between letters are not uniform, for example the "a" and "t" are too far apart while "t" and "i" are too close. The amount of such bad kerns (especially visible in large font sizes) is greater in low quality fonts than in high quality ones; however, in any text string and in any font you will probably find pairs of letters that will benefit from kerning adjustments.
Inkscape makes these adjustments really easy. Just move your text editing cursor between the offending characters and use Alt+arrows to move the letters right of the cursor. Here is the same heading again, this time with manual adjustments for visually uniform letter positioning:

In addition to shifting letters horizontally by Alt+Left or Alt+Right, you can also move them vertically by using Alt+Up or Alt+Down:

Of course you could just convert your text to path (Shift+Ctrl+C) and move the letters as regular path objects. However, it is much more convenient to keep text as text — it remains editable, you can try different fonts without removing the kerns and spacing, and it takes much less space in the saved file. The only disadvantage to the "text as text" approach is that you need to have the original font installed on any system where you want to open that SVG document.
Similar to letter spacing, you can also adjust line spacing in multi-line text objects. Try the Ctrl+Alt+< and Ctrl+Alt+> keys on any paragraph in this tutorial to space it in or out so that the overall height of the text object changes by 1 pixel at the current zoom. As in Selector, pressing Shift with any spacing or kerning shortcut produces 10 times greater effect than without Shift.
XML editor
The ultimate power tool of Inkscape is the XML editor (Shift+Ctrl+X). It displays the entire XML tree of the document, always reflecting its current state. You can edit your drawing and watch the corresponding changes in the XML tree. Moreover, you can edit any text, element, or attribute nodes in the XML editor and see the result on your canvas. This is the best tool imaginable for learning SVG interactively, and it allows you to do tricks that would be impossible with regular editing tools.
Conclusion
This tutorial shows only a small part of all capabilities of Inkscape. We hope you enjoyed it. Don't be afraid to experiment and share what you create. Please visit www.inkscape.org for more information, latest versions, and help from user and developer communities.