This tutorial will demonstrate various tips and tricks that users have learned through the use of Inkscape and some "hidden" features that can help you speed up production tasks.
Radial placement with
It's easy to see how to use the dialog for rectangular grids and patterns. But what if you need radial placement, where objects share a common center of rotation? It's possible too!
If your radial pattern need only have 3, 4, 6, 8, or 12 elements, then you can try the P3, P31M, P3M1, P4, P4M, P6, or P6M symmetries. These would work nicely for snowflakes and the like. A more general method, however, is as follows.
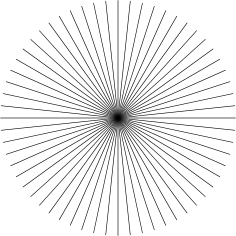
Choose the P1 symmetry (simple translation) and then compensate for that translation by going to the tab and setting and both to -100%. Now all clones will be stacked exactly on top of the original. All that remains to do is to go to the tab and set some rotation angle per column, then create the pattern with one row and multiple columns. For example, here's a pattern made out of a horizontal line, with 30 columns, each column rotated 6 degrees:
To get a clock dial out of this, all you need to do is cut out or simply overlay the central part by a white circle (to do boolean operations on clones, unlink them first).
More interesting effects can be created by using both rows and columns. Here's a pattern with 10 columns and 8 rows, with rotation of 2 degrees per row and 18 degrees per column. Each group of lines here is a "column", so the groups are 18 degrees from each other; within each column, individual lines are 2 degrees apart:

In the above examples, the line was rotated around its center. But what if you want the center to be outside of your shape? Just create an invisible (no fill, no stroke) rectangle which would cover your shape and whose center is in the point you need, group the shape and the rectangle together, and then use on that group. This is how you can do nice "explosions" or "starbursts" by randomizing scale, rotation, and possibly opacity:

How to do slicing (multiple rectangluar export areas)?
Create a new layer, in that layer create invisible rectangles covering parts of your image. Make sure your document uses the px unit (default), turn on grid and snap the rects to the grid so that each one spans a whole number of px units. Assign meaningful ids to the rects, and export each one to its own file. Then the rects will remember their export filenames. After that, it's very easy to re-export some of the rects: switch to the export layer, use Tab to select the one you need (or use Find by id), and click Export in the dialog. Or, you can write a shell script or batch file to export all of your areas, with a command like:
inkscape -i <area-id> -t <filename.svg>
for each exported area. The -t switch tells it to use the remembered filename hint, otherwise you can provide the export filename with the -e switch. Alternatively, you can use the svgslice utility to automate exporting from Inkscape SVG documents, using either a slice layer or guides.
Non-linear gradients
The version 1.1 of SVG does not support non-linear gradients (i.e. those which have a non-linear translations between colors). You can, however, emulate them by multistop gradients.
Start with a simple two-stop gradient. Open the Gradient editor (e.g. by double-clicking on any gradient handle in the Gradient tool). Add a new gradient stop in the middle; drag it a bit. Then add more stops before and after the middle stop and drag them too, so that the gradient is smooth. The more stops you add, the smoother you can make the resulting gradient. Here's the initial black-white gradient with two stops:

And here are various "non-linear" multi-stop gradients (examine them in the Gradient Editor):

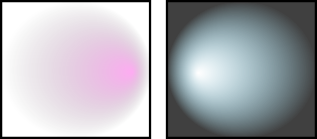
Excentric radial gradients
Radial gradients don't have to be symmetric. In Gradient tool, drag the central handle of an elliptic gradient with Shift. This will move the x-shaped focus handle of the gradient away from its center. When you don't need it, you can snap the focus back by dragging it close to the center.
Aligning to the center of the page
To align something to the center or side of a page, select the object or group and then choose from the list in the Align dialog (Ctrl+Shift+A).
Cleaning up the document
Many of the no-longer-used gradients, patterns, and markers (more precisely, those which you edited manually) remain in the corresponding palettes and can be reused for new objects. However if you want to optimize your document, use the command in File menu. It will remove any gradients, patterns, or markers which are not used by anything in the document, making the file smaller.
Clipping or masking a bitmap
By default, an imported bitmap (e.g. a photo) is an <image> element which is not editable by the Node tool. To work around this, convert the image into a rectangle with pattern fill by (Alt+I). This will give you a rectangle filled with your bitmap. Now this object can be converted to path, node-edited, intersected with other shapes etc. In ( tab), you can set the option of always importing bitmaps as pattern-filled rectangles.
Hidden features and the XML editor
The XML editor allows you to change almost all aspects of the document without using an external text editor. Also, Inkscape usually supports more SVG features than are accessible from the GUI. For example, we now support displaying masks and clipping paths, even though there's no GUI for creating or modifying them. The XML editor is one way to get access to these features (if you know SVG).
Changing the rulers' unit of measure
In the default template, the unit of measure used by the rulers is px ("SVG user unit", in Inkscape it's equal to 0.8pt or 1/90 of the inch). This is also the unit used in displaying coordinates at the lower-left corner and preselected in all units menus. (You can always hover your mouse over a ruler to see the tooltip with the units it uses.) To change this, open (Ctrl+Shift+D) and change the on the tab.
Stamping
To quickly create many copies of an object, use stamping. Just drag an object (or scale or rotate it), and while holding the mouse button down, press Space. This leaves a "stamp" of the current object shape. You can repeat it as many times as you wish.
Pen tool tricks
In the Pen (Bezier) tool, you have the following options to finish the current line:
-
Press Enter
-
Double click with the left mouse button
-
Select the Pen tool again
-
Select another tool
Note that while the path is unfinished (i.e. is shown green, with the current segment red) it does not yet exist as an object in the document. Therefore, to cancel it, use either Esc (cancel the whole path) or Backspace (remove the last segment of the unfinished path) instead of .
To add a new subpath to an existing path, select that path and start drawing with Shift from an arbitrary point. If, however, what you want is to simply continue an existing path, Shift is not necessary; just start drawing from one of the end anchors of the selected path.
Entering Unicode values
While in the Text tool, pressing Ctrl+U toggles between Unicode and normal mode. In Unicode mode, each group of 4 hexadecimal digits you type becomes a single Unicode character, thus allowing you to enter arbitrary symbols (as long as you know their Unicode codepoints and the font supports them). To quit the Unicode mode, you can press Esc. For example, Ctrl+U 2 0 1 4 Esc inserts an em-dash (—).
Using the grid for drawing icons
Suppose you want to create a 24x24 pixel icon. Create a 24x24 px canvas (use the ) and set the grid to 0.5 px (48x48 gridlines). Now, if you align filled objects to even gridlines, and stroked objects to odd gridlines with the stroke width in px being an even number, and export it at the default 90dpi (so that 1 px becomes 1 bitmap pixel), you get a crisp bitmap image without unneeded antialiasing.
Object rotation
When in the Select tool, click on an object to see the scaling arrows, then click again on the object to see the rotation and shift arrows. If the arrows at the corners are clicked and dragged, the object will rotate around the center (shown as a cross mark). If you hold down the Shift key while doing this, the rotation will occur around the opposite corner. You can also drag the rotation center to any place.
Or, you can rotate from keyboard by pressing [ and ] (by 15 degrees) or Ctrl+[ and Ctrl+] (by 90 degrees). The same [] keys with Alt perform slow pixel-size rotation.
Open dialog as an object palette
If you have a number of small SVG files whose contents you often reuse in other documents, you can conveniently use the Open dialog as a palette. Add the directory with your SVG sources into the bookmarks list so you can open it quickly. Then browse that directory looking at the previews. Once you found the file you need, simply drag it to the canvas and it will be imported into your current document.
Bitmap drop shadows
While Inkscape does not yet support the Gaussian blur SVG filter, you can easily create blurred drop shadows for objects as bitmaps, via the "Create a Bitmap Copy" command with a filter script. See share/extensions/inkscape-shadow.README for details and limitations of this method.
Placing text on a path
To place text along a curve, select the text and the curve together and choose "Put on Path" from the "Text" menu. The text will start at the beginning of the path. In general it is best to create an explicit path that you want the text to be fitted to, rather than fitting it to some other drawing element - this will give you more control without screwing over your drawing.
Selecting the original
When you have a text on path, a linked offset, or a clone, their source object/path may be difficult to select because it may be directly underneath, or made invisible and/or locked. The magic key Shift+D will help you; select the text, linked offset, or clone, and press Shift+D to move selection to the corresponding path, offset source, or clone original.
Window off-screen recovery
When moving documents between systems with different resolutions or number of displays, you may find Inkscape has saved a window position that places the window out of reach on your screen. Simply maximise the window (which will bring it back into view, use the task bar), save and reload. You can avoid this altogether by unchecking the global option to save window geometry (, tab).
Transparency, gradients, and PostScript export
PostScript or EPS formats do not support transparency, so you should never use it if you are going to export to PS/EPS. In the case of flat transparency which overlays flat color, it's easy to fix it: Select one of the transparent objects; switch to the Dropper tool (F7); make sure it's in the "pick visible color without alpha" mode; click on that same object. That will pick the visible color and assign it back to the object, but this time without transparency. Repeat for all transparent objects. If your transparent object overlays several flat color areas, you will need to break it correspondingly into pieces and apply this procedure to each piece.
Exporting gradients to PS or EPS does not work for text (unless text is converted to path) or for stroke paint. Also, since transparency is lost on PS or EPS export, you can't use e.g. a gradient from an opaque blue to transparent blue; as a workaround, replace it by a gradient from opaque blue to opaque background color.