

Adding and Removing Files
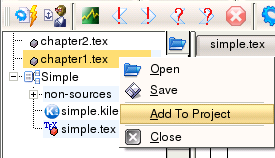
To add a file to your project, open any TEX file, right click on its name in the Files and Project view, and select Add to Project. If you have multiple projects open, a dialog box will ask you which project the file has to be added to.
If you have multiple files to be added to a project, you can select the project from the Files and Project view and right-click then select Add Files; you will then be able to select your files in a dialog box.
You can also right-click on the project's name in the Files and Project view, and select Add Files... to bring up a file selection dialog.
To remove a file from a project, right-click on it and select Remove File. This does not delete your file, but only removes it from the list of files contained in the .kilepr extension.

