
When you first start Kdenlive, you will have a window looking something like this :
In the default layout, there are three areas of the main window. Whilst all layouts in Kdenlive are fully configurable, it is assumed for this tutorial that you are using the default layout.
The panel to the top left holds various informational and editing tabs about the current project:
The first one is the Project List tab. The Project List shows the video clips, images, slideshows, colour clips and title clips that belong to your project.
Second tab is the Transitions tab. It shows you all available video transitions that can be used in your project and, while in editing mode, allows you to change different parameters.
Third tab is the Effect List tab. In the same way as transitions, it shows you available audio and video effects for your project.
Finally, last tab is the Effect Stack tab. If you have different effects applied to your clips, in this tab you will be able to define the processing order and also parametrise them.
The panel to the top right holds the various monitors that Kdenlive uses.
The Timeline monitor displays the final video - what your final edit will look like.
The Clip monitor is used to preview clips, and to select a section of a clip to add to the timeline.
The Capture monitor allows you to directly capture video from a camera connected to your computer Firewire port. Provided your camera allows, you'll be able also to control it from the monitor (Play, Stop, FF, ...), preview your video and capture any part of it as a DV file.
The panel at the bottom of the window holds the timeline. The timeline gives you a visual representation of your project, and shows when clips start, when they end, and in the case of overlapping clips, which one will actually be used. The timeline can contain multiple tracks. You can add video clips, sound clips, and other fancy stuffs to the tracks.
A status bar is located at the bottom of the timeline. This bar provides information about your project and also holds some useful icons (![]() ) to toggle on/off the thumbnails for video, audio, transitions & effects.
) to toggle on/off the thumbnails for video, audio, transitions & effects.
Now that you know what all those sections and buttons in the window are, we will do a basic configuration for a project, add pieces of video and sound to it, move those pieces around and so on.
Before starting your first project, you are asked for a name, a working directory and a video size. You are always able to change this latter at the Project -> Configure Project menu option.
For detailed information about project settings and preferences, take a look at this page.
It goes without saying that to get any further, you will need to have some clips on your computer that you can use. To get some clips, you could go to 'YouTube', or capture them directly using either your video camera or TV-capture-device. For this section we assume that you already have some files available that are supported by Kdenlive (see supported formats in the features page.
Now that you have some clips, you can add them to your project. Select the Project List tab on the project pane, and then click on the "Add clip" icon (![]() ) in the top right to bring up the context menu. From here, select "Add Clips" to bring up a standard KDE open dialog. Find your clips, select as many as you want to add (select more than one by holding the Ctrl key), and they will be added!
) in the top right to bring up the context menu. From here, select "Add Clips" to bring up a standard KDE open dialog. Find your clips, select as many as you want to add (select more than one by holding the Ctrl key), and they will be added!
Your added clips will now appear in the project list, along with their duration and a few other pieces of information (like a thumbnail).
For the purpose of this Quickstart guide, and in order to show you the basic Kdenlive functionalities, we'll work with two of your clips, adding a title at the beginning, a video transition between them and a video effect to a part of one clip. Finally, we'll render the project to obtain a nice DVD ready to be burned and played on our TV.
Firstly, we are going to create a title clip for your project. Kdenlive is able to create simple titles. We can also work with external image editors (like GIMP) to create more sophisticated titles and then add them to the project list as explained above.
To create a title clip, select "Add clip" icon (![]() ) and, in the context menu, select "Create Text Clip". A new window like this will be presented:
) and, in the context menu, select "Create Text Clip". A new window like this will be presented:

In this window, you can give a name to your clip, define the duration, the letter type, size and colour. You'll also have the following icons:
![]() To enter the text
To enter the text
![]() To draw a box
To draw a box
![]() To bring to front / send back the text or the box
To bring to front / send back the text or the box
You can now select the "Enter text" icon, write the title and click "OK". The text will appear in the window and you can drag and drop it wherever you want on the screen. To improve your title, click the "Draw box" icon and, with the left mouse button pressed, draw a box on the screen. Before doing so, you need to change the box colour in the same way as you did for the text. If the box and the text have the same colour, they may interfere!
Don't worry if you can't see your text now! Select the box and try with the "Bring to front/send back" icons. Better now, huh?
By dragging and dropping the box and the text and by playing with the movement icons, you can obtain quite nice titles!
Now that you have some clips in your project, it is time to start editing them together into your dream video. There are two basic ways to add a clip to the timeline.
You can drag a clip directly from the project list. Select one of the clips that you have added to the project list, and drag it to the timeline. As soon as the mouse reaches a track, the clip will appear on the track. With this kind of drag, the entire duration of the clip is placed on the timeline. You can then edit the clip from the timeline.
The other way is to select a segment of a clip and then add this segment to the timeline. When you click on a clip in the project list, the Clip Monitor will automatically load the clip. You can then press Play on the Clip Monitor and get an idea of which bits of the clip you actually want on the timeline. Then, position the seek marker (![]() ) to where you want your clip to start and click the "inpoint" button (
) to where you want your clip to start and click the "inpoint" button (![]() ). Move the cursor to where you want the clip to end, and click the "outpoint" button (
). Move the cursor to where you want the clip to end, and click the "outpoint" button (![]() ). Finally, you can move this cut-down clip to the timeline by clicking the video screen on the Clip Monitor and, holding down the left mouse button, placing it in the desired point of the timeline. The selected zone between the in and out point will then appear there as a clip (to be more precise, a subclip as we've selected only a part of the original clip).
). Finally, you can move this cut-down clip to the timeline by clicking the video screen on the Clip Monitor and, holding down the left mouse button, placing it in the desired point of the timeline. The selected zone between the in and out point will then appear there as a clip (to be more precise, a subclip as we've selected only a part of the original clip).
Choose your way and, to continue with the quickstart guide, be sure to move two clips (or subclips) to the timeline. One to Track #1 and the other to Track #2.
Moving the selected clips around on the timeline is as simple as clicking on them with the left mouse button and dragging them around. You can resize clips directly from the timeline. Simply move the mouse cursor to the beginning or end of the clip you want to resize. Now, click and drag with the left mouse button to resize the clip.
Resizing a clip changes its in and out points. If you reselect the clip and look in the clip monitor, you will see that the in and out points on the monitor show the new positions. It is not possible to resize an audio or video clip past their length - if a clip is 30 seconds in length, then you will not be able to resize the clip so that it finishes playing 35 seconds into the clip! -. On the other hand, you can resize text, image or color clips to increase or reduce their length as you want.
When you are resizing and moving clips, there is a handy "snap to" feature, which will snap the edges of clips to other clips and the current seek position. This is useful for quickly lining clips up with each other, but in some cases may not be what you want. You can turn this behaviour on and off using the "Snap to" icons: ![]()
There are some ways to remove a clip from the timeline. Maybe the easier one is to select the clip or clips that you want to delete, and press the "Delete" button in your keyboard.
Another way is to select the clips that you want to delete, press the right mouse button and in the context menu select option Delete Clip.
By this, you'll remove the clip from the timeline but it still appears in the "Project Tree" list. If you select the clip here and proceed as above, you'll remove it also from the project. But do not worry, it still remains physically in your disk!
Sometimes you may need to delete (maybe because you let your video-camera or TV-capture-device run too long) or maybe to apply a video effect to only a part of a clip. Kdenlive allows you to do so by splitting the original clip.
To split a clip, the normal way is to place the timeline cursor at the splitting point (you can adjust the exact position by playing with the "Next frame" ![]() and "Previous frame"
and "Previous frame" ![]() buttons in the "Timeline Monitor"). Then press the right mouse button and in the context menu select option Razor Clip. With this option only the clip in the current track will be split. You can split all clips at that position selecting the option Razor All Clips in the edit menu.
buttons in the "Timeline Monitor"). Then press the right mouse button and in the context menu select option Razor Clip. With this option only the clip in the current track will be split. You can split all clips at that position selecting the option Razor All Clips in the edit menu.
We are going now to add a transition between two clips. Transitions are normally used to smoothly change from one clip to another (or from one scene to another). Some transitions can be used also as video effects (Picture in Picture, for example). These powerful features are explained in detail in this page, but for the purpose of this quickstart guide, we'll focus on an easy one, the crossfade transition.
Before start, be sure that you have your two videoclips in tracks #1 and #2. Also, move (as explained before) the title clip that we've created previously to the start of track #0.
If we want to apply a transition, we need to overlap the required clips in different tracks. So first thing to do is to move the clip in track #1 to overlap with the title in track #0, let say by 2 seconds.
To better control this overlap you can change the timeline zoom using the viewer tool ![]() . Click on the magnifying glass and select a small scale or click on the ruler and drag left.
. Click on the magnifying glass and select a small scale or click on the ruler and drag left.
Once done, click on the title clip and press the right mouse button. In the context menu select Add transition -> Crossfade. A yellow bar will appear between the clips in tracks #0 and #1 indicating your transition has been added to the project.
At this point your screen should look like this one:

To have a real time view of how your transition works, you can click the seek marker ![]() and drag it over the transition area. If everything is OK, you should see in the "Timeline Monitor" how the title clip dissapears at the same time the video clip is displayed.
and drag it over the transition area. If everything is OK, you should see in the "Timeline Monitor" how the title clip dissapears at the same time the video clip is displayed.
To edit a transition and change parameters, you can double click on it (the yellow bar). In this way, it will become red and the focus in the "Project Panel" will change to the "Transition tab". In this tab you'll be able to change the transition parameters if needed.
As the Crossfade is an easy transition, the only parameters you can change are the transition direction and the track where it applies.
If the Invert direction parameter is selected, the upper track clip is shown first and the transition is applied until the view changes to the lower track clip. If the parameter is not selected, then the direction is the other way round.
The track to apply the transition is normally the next track after the one where we created the transition. But you can change this behaviour by selecting others in the Track Selection List. This is a powerful feature for advanced transitions, but for the moment we'll not use, so be sure your selection is Automatic – Use next video track.
You can play now creating a new transition between clips in tracks #1 and #2 in the same way as explained above.
Now you know how to create a transition between clips, is time to experiment with another feature in Kdenlive: The effects.
Effects are ways to change your original clip. Kdenlive comes with different effects that can be applied to the audio and others that can be applied to the video. The small number of standard audio effects can be easily increased if you use the Ladspa plug-ins (see this page to know how to load them).
To know in detail all effects and how they works, you can have a look at this page.
In this guide we'll know how to apply a "Greyscale" effect to a clip. This effect, as the name indicates, will take out colors from the video and display it in black & white (well, really using black, white and different grey tones! ).
Normally, except some of them, the effects apply to a full clip so, if you want to limit the effect to just a part, you need to create "subclips" as explained before in this page.
So let's go to clip in track #2. Select it and click the right mouse button. In the context menu select Add Video Effect -> Greyscale. You'll see immediatly how the colours in your clip dissapear and are replaced by grey tones!
In the same way as transitions, you can also edit the effect parameters. To do so, select the "Effect Stack" tab in the Project Panel. Unfortunately, the Greyscale effect is so easy that has no parameters!
But in this tab, you can also find some useful icons to organize the effects:
![]() to move the effect up in the list (that means it will be applied first to the clip)
to move the effect up in the list (that means it will be applied first to the clip)
![]() to move the effect down in the list
to move the effect down in the list
![]() to reset all effect parameters to the default values
to reset all effect parameters to the default values
![]() to remove the effect from the clip
to remove the effect from the clip
You can see also that behind the effect name there's a checkbox. If you uncheck it, the effect will not be applied but still remains in the effect list with the selected parameters (if any!). This is useful if you want to use it later on.
And behind the "Parameters" tab, you'll notice another one titled "Keyframes". For some effects, you can select as many keyframes as you need in the clip and for each keyframe you can define different parameters. This is useful if you want, for example, mute a part of a clip. You can do so in two ways:
- Creating a subclip and applying the "Mute" audio effect to this subclip - Or using the "Volume" effect. This can be applied to the full clip and, by defining different keyframes you can adjust the volume, for example, to start muted, then increase progressively, then continue at normal level, then decrease progressively and become muted, continue muted for a time and start again progressively ...
To know more about keyframes and how to work with them see this page
At this point we are ready to render our project and see how it looks on our TV, PC, ... If you've followed the steps until now, your screen should look like this one:

You have a title clip in track #0 with a crossfade transition between it and the other clip in track #1. Another transition (this one costum made by you!) between this clip and the one in track #2 and a greyscale effect applied to this clip.
Now follow some steps to create a DVD with this project. With Kdenlive you'll be able to easily create a DVD video structure and burn it (if you have installed the program k3b). You will also add a simple menu with chapters and even with an intro movie if you like.
To create a DVD video, you can follow these steps:
- Select the menu option Render -> Export to DVD. - You'll be presented with a window to enter export details:
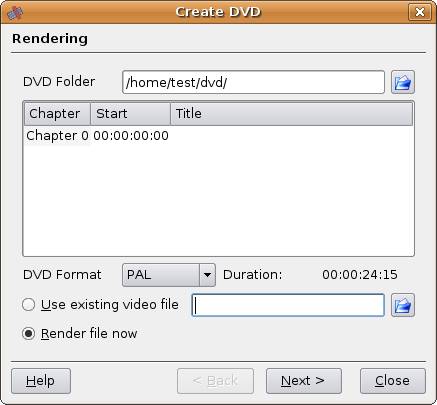
- In this screen you should enter the folder name where the DVD structure should be created and the DVD format (PAL/NTSC). Be sure that the option "Render file now" is selected.
As you can see, in this screen it's also possible to define the DVD chapters and also to create the DVD from an existing video file (.VOB), but for the moment we are not going to use these options. For further details see this page.
- Press the "Next" button. In the following dialog you can select to create a DVD menu or not. If you want to, check the "Create Menu" option and the rest of the data will be accessible.
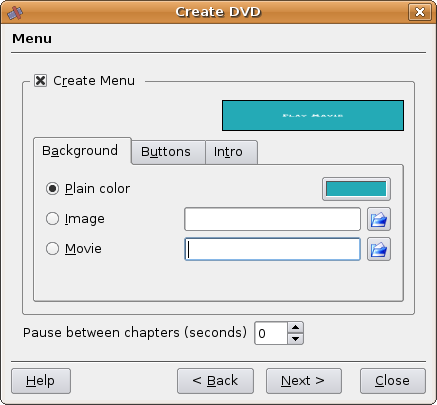
You can choose to use a plain colored screen for your menu (click on the color box to select it), an image file or even a movie file (enter the path and name if selected). Also, you can define a pause between chapters if you have created such.
In the "Buttons" tab you can define the title text, font and size and the different colors for the button depending on status (not selected, selected, pressed).
In the "Intro" tab you can indicate a video file to be presented before the menu appears in the screen (like an introduction video).
- When you've entered data, press again the "Next" button. Kdenlive is now ready to generate the DVD using the program DvdAuthor. Click on "Generate DVD" to do so.
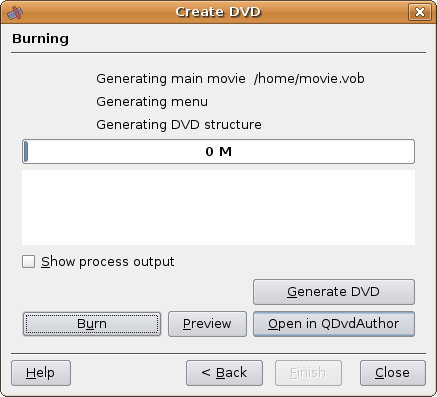
A message will appear telling you to continue working while the video is generated. You can see progress in the "Status Bar".
When the process is finished, you may choose to work with the generated DVD externally (you'll find the Audio & Video directories in the specified path) or return again to this screen by selecting menu option Render -> Export to DVD. If you decided to go on with Kdenlive, you'll have options to directly burn your video (using k3b), preview it (using Xine) or edit again the structure (using QDvdAuthor).
Congratulations! You've created your first video with Kdenlive. Enjoy it and continue reading to know more about this program and its advanced features.