A basic flight simulator tutorial
Foreword
Aviation is about extremes:
- An airplane is
quite fragile and flies at huge speeds. Yet it is one of the most
secure
transport devices.
- A pilot constantly follows
rules and
procedures. Yet an airplane is a symbol of freedom.
- Once you are
trained, flying a little airplane is easy. Yet if a problem occurs,
you have to sort of solve a rubicube in a few seconds.
- Many flight tutorials are
written with a lot of humor. Yet
an attempt
to make humor or show your skills with a real aircraft will bring you
before a court.
This tutorial is based on the Cessna 172p, which
is the default airplane on lots of flight simulators and a great
airplane:
Possibly take a quick look at the following articles. You may feel the
need to
come back to them later. They contain answers to questions that
can arise while reading this tutorial. The first ones show the
airplane's main parts and controls:
Hardware
I assume you are using the regular mouse and keyboard of your
computer. You need no joystick nor plastic pedals or control yoke to
use the
flight
simulator. Such hardware would be more realistic
(especially with force feedback). Yet I don't own any myself
and I
suppose most flight simulation candidates don't.
You need a "3D-accelerated graphics card" inside your
computer and its proper drivers installed. Don't bother if you don't
know what this is. Today most computers are sold with such a graphics
card. Simply install the flight simulator software and start it to
check you get a fluent display. If not, either an 3D-accelerated
graphics card isn't installed or its drivers aren't properly installed.
Get help.
Sound is not mandatory but it really helps. For example when landing
you need to hear the wheels touch the runway. Sound is one of the
direct neural connections that allow a pilot to become the airplane's
brain.
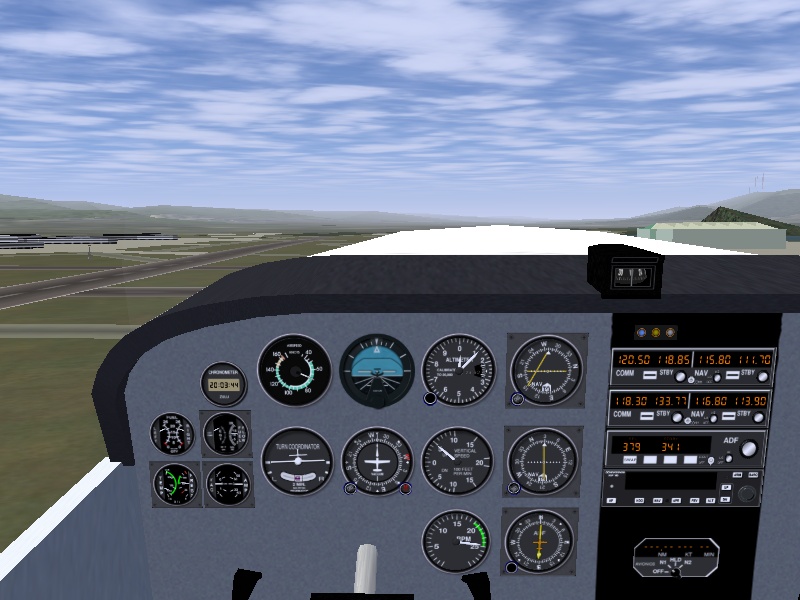
Software
To know the trim position, use the HUD (h,
H and I) or the I-shaped indicator on the
schematic instrument panel
(P).
The trim movement is very slow. Be patient.
Lots of modern airplanes have a remote control for the trim: a little
switch on the yoke, that you can manipulate easily with your fingers.
So you don't have to duck to roll the big wheel.
What direction am I flying?
Four basic methods exist to know what direction you are flying:
- Look through the windows.
Try to learn and recognize all
sorts of ground features, like hills, bridges, cities, forests... The
Sun and the Moon are essential features, but clouds can cover them and
they move through the sky. Looking through the windows can be quite
hectic on a flight
simulator. You only have a narrow view on the virtual outside world.
Using two more displays, placed left and right of the main one, will
help. Yet this is expensive and not mandatory. Several ways exist to
allow you to pan your virtual head inside the airplane:
- Use Shift and the four
arrow keys to
look frontwards, backwards,
leftwards and rightwards.
- Use Shift and the
keypad
keys to look in the four
directions mentioned above and in four diagonal directions in-between.
- Put the mouse in pan
mode (right button, <-|->
cursor look). This allows
you to look in just every direction, including towards the sky and
towards
the ground. This method is great while the autopilot is on. It is
a little dangerous otherwise, because the plane will bank or fall while
you're looking all around. Click the left mouse button to quickly get
back to the default forwards vision. Hint: if you click the left mouse
button to center the vision back, by the time you click the right mouse
button to go out of mouse look mode you will already have panned a few
degrees away from the forward view. This is not a serious problem,
except for the fact it prevents the instrument panel to appear when
typing P. A
solution is to
lift the mouse before you click the left button. Then click the right
button. Then let the mouse back down. (While the autopilot is on
and you are looking all around, use the x, X
and Ctrl-x keys to zoom in
and out. Use the z, Z
and Ctrl-z keys to dissolve
the mist outside.)
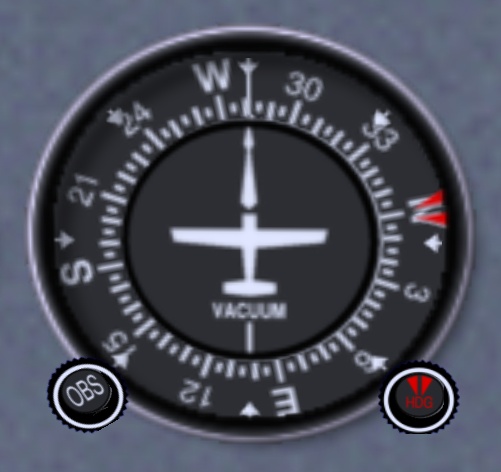
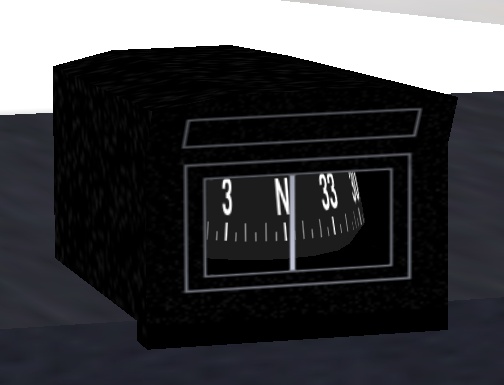
- The compass
(picture
below). This is the indicator located
above the
instrument panel. The compass is a very simple and classical, yet not
perfectly reliable instrument. When flying over some places, magnetic
perturbations on the ground can make the compass tell nonsense. Also,
the compass never shows the real direction of the North, East or South.
Rather it shows a direction a few degrees aside from the real direction
(depending on the country you are in). Close to the poles the error of
the compass becomes really strong.
- The directional
gyro
(picture below) or "heading indicator". The gyro is started before
take off and keeps its
initial heading for hours. It simply tells you how many degrees you
turned to the left or to the right. You are supposed to tune in the
right direction of the North Pole before you take off, using the knob
at the bottom left of the instrument (normal mouse pointer mode, click
left or
right
half of the knob, middle mouse button to move faster, Ctrl-c
to highlight halves). (The red knob, bottom right, is used to tell the
autopilot what direction you wish to fly (HDG
= "heading").
- The clock. If you make
steady turns, at the angle proposed
by the turn indicator, a 180° turn takes 60 seconds whatever
the flight
speed (yet it is 50 seconds on FlightGear...).
!
During a real flight in
a
real
airplane, you
are supposed to cross-check all direction indicators once in a while.
Memorize the directions: North is 0°, East is
90°, South is 180° and West is 270°.
A realistic take off
By now I assume you are able to keep the airplane on the runway while
taking off (rudder) and you're able to fly straight, descend
peacefully, gain altitude steadily, make gentle turns (yoke)... No need
you perform this all perfectly. Yet a basic and approximate control of
the airplane has been acquired.
Rules during take off:
- You are not allowed to keep
the front wheel on the ground
above 40 knots. It would shimmy.
- When close to the ground (I don't know the exact limit) you have
to keep the two rear wheels at the same height above the runway. The
reason is any moment you will or may touch the ground. You need to
touch with both two rear wheels together. That means you need to keep
the
wings level with the horizon. Hence you cannot make use of the
yoke/mouse/ailerons to turn. Instead you use the rudder pedals to turn.
(Since you fly around 70 knots, this yields not too much sideways
force problems.) The yoke/mouse/ailerons are used to keep the wings
level with the horizon.
- You are not allowed to fly lower than 500 feet above the ground.
The sole exception is in the axis of the runway, during take off and
during landing. (While flying over cities you are not allowed to fly
lower than 1,000 feet above the ground.)
- When lower than 500 feet above the ground, you are not allowed to
fly slower than 70
knots speed.
That's because a blow of wind from the rear can occur any moment. You
need to fly fast enough so that such wind blows won't make the plane
stall and fall to
the
ground.
- When lower than 500 feet (above the ground),
you are not allowed to fly much
faster
than 70
knots. You
wouldn't be able to make maneuvers quick enough. You would be more
destructive if you hit something. Besides, 70 knots is a nearly optimal
speed to gain altitude and your sole acceptable purpose while lower
than 500 feet is to gain altitude...
- While taking off, you must stay aligned with the
runway. Indeed that's the sole place you are allowed to fly below 500
feet. (If you take off from a long runway like KSFO, this also allows
to land back safely and quickly should an emergency occur. (Above a
short runway, you
cannot simply dive and get back on the runway, because it is too short.
You need to turn and circuit to make a regular landing. For this you
need to have enough engine power or to be at least at 500
feet above
the ground. Otherwise, quickly find a place where you can make an
emergency landing.))
So, you need to take off and rise in the
air at a steady speed
of around 75 knots.
Problem: since the front wheel is slightly lifted and the flaps are one
step
deployed, the plane will rise from the ground already at 55 knots.
That's well below the desired flight speed of 75 knots. What to do
then?
Answer: as soon the two rear wheels lift from the ground,
push the yoke forwards a little. Keep the plane close above the
ground. (The aim of this is: should a wind blow from the rear occur,
the plane will fall from only a few feet hight.) (Please do not train
to keep the plane exactly two
feet above the ground. Doing so would be dangerous. Do allow the plane
to rise slightly while it accelerates, but, simply put: do not favor
this tendency.) So, keep it close
above the
ground while accelerating, till a speed of about 70 knots is reached.
Then switch to the opposite mode: now you must pull on the yoke to
prevent the plane from going above 75 knots. Force the plane to
rise in the air, so it doesn't gain speed. Keep in control. If the
speed goes below 75 knots, push a little on the yoke. If it rises above
75 knots, pull a little on the yoke. Till you reach 500 feet above the
ground.
This is the procedure I use to take off. I assume you just started
FlightGear; the airplane is at the start of the runway and the engine
is turning at minimum power:
- Get a HUD (h, H, i
and I) or the schematic
instrument panel with the I indicator (2D panel aircraft from start or
key P).
- Deploy one step of flaps (]).
- Get in mouse yoke mode (+
pointer shape) by clicking on the right mouse button.
- Pull the yoke/mouse/elevator to 1/2 the total way:
- Ensure the yoke/mouse/ailerons is centered:
- Push the left mouse button down and keep it down, so the mouse
gets in rudder control mode. (If you don't want to use the mouse to
control the rudder, use the keypad 0
and Enter keys.) (Before you
push the left mouse button, ensure the yoke/elevator is pulled 1/2 like
asked above and the yoke/ailerons is centered.)
- Keep the Page Up key
down till the engine roars at its maximum
power.
- The airplane is now accelerating. Move the rudder/mouse to the
left and to the right to keep aligned with the runway (the left button
is pressed). You need to keep
in the middle of the runway but this does not need to be very precise.
More important is your path is parallel with the runway middle line and
stable.
- Because the yoke/elevator is pulled 1/2 in, around 40 knots the
nose will rise up. Immediately release the left mouse button, to get
back in yoke control mode. Immediately push the yoke/mouse a little
bit, to keep the engine cover
below the horizon. You just need to let the front wheel rise a little
bit above the runway. Let the rudder keep its angle (probably slightly
turned to the right; two keypad Enter
hits from the center position). From now on keep the left mouse button
released,
to stay in yoke control mode. Use the keypad 0 and Enter keys to control the rudder.
(You can also make short presses on the left mouse
button to make little rudder adjustments. I prefer using the keys.)
- The airplane soon leaves the ground. The two rear wheels no
longer
touch the runway. Push the mouse a little, to prevent the airplane from
rising in the air. Keep it flying close above the runway and aligned
with
it. Well, do not try to stick really close to the ground... this would
be
dangerous. Do allow the plane to rise a little bit. Just do not favor
the
rising... Simply keep in mind your aim is to accelerate and not to gain
altitude. (Due to a mistake and/or an emergency situation (engine
failure, gust of wind, sudden obstacle...), some pilots have had the
bad reflex to pull on the yoke during this early part of the take off.
This resulted in a stall and the plane falling to the ground at high
speed... The consequences were often extreme.)
- Use the yoke/ailerons/mouse to keep the wings level with the
horizon. Use the rudder/keypad 0
and Enter to turn (needs
training). Optimal rudder position seems to be slightly right from
neutral; two keypad Enter
hits. Only slow and slight rudder tunings should be needed, maybe no
tuning at all.
- Once the airspeed reaches 70 knots, pull on the yoke/mouse a
little bit. Now
the airplane firmly rises in the air. If the speed gets below 75
knots,
push the yoke to force the airplane to rise slower and gain airspeed.
If the speed rises above 75, pull the yoke to rise faster and decrease
the airspeed. There is no need to be very precise. Try to keep a stable
speed. Just avoid to go below 70 knots and above 80 knots.
- Don't keep your eyes too much on the speed indicator while you
are
rising above the runway. Rather look at the horizon and at the engine
cover. The top of the engine cover should roughly match with the
horizon
line:
- If you want to check the position of the runway but you can't see
it
because it is hidden by the engine cover, push the yoke/mouse a short
while to make the nose dive a little bit for a second. This only works
for long runways. Another trick is to look for a building, a hill or
something far in
front of the runway, on the horizon. Keep aiming at that object while
rising in the air. Keep the engine cover a little below the horizon
line, so the object you aim at stays visible.
- Once you reach 500 feet, retract the flaps ([) and push the yoke
a little. Center the rudder (slowly, one step at a time). You are now
allowed to gain speed or go on climbing (your
choice, or the control tower's). Decrease the
engine power a little so the
RPM needle keeps in the green zone (Page
Down). Turn calmly
towards your intended
flight direction. Use your time to optimize the mixture. You're in
flight.
500 feet above the ground is the minimum flight altitude above open
land. Above a
city the
minimum altitude is 1,000 feet.
If you take off from KSFO heading to the West, you have city areas in
front of you and left of you. So, once you reach 500 feet above the
ground, best turn to the right.
Don't forget to center the rudder. If the rudder is pushed to
one side, this will brake the plane. It makes the plane move
sideways through the air, with its flank aerobraking.
Don't forget to retract the flaps.
!
During a real take off
you
must keep in
touch with
the control tower. You also have to constantly look in all directions
to check no other airplane is coming in your direction.
An aviation classic is the ground effect.
It's the fact a wing lifts
better when close above to the ground. That too makes the wheels leave
the ground at quite a low speed, a speed at which the airplane cannot
really fly. While you are accelerating a few feet above the runway,
you are in ground effect. If you know about it, ground effect is an
advantage because it makes flying close above the ground more secure.
The airplane behaves a tiny little bit like a hovercraft. If you are
not aware of the ground effect, it can cause problems. For example it
can make you think the airplane has enough speed to rise in the
air, while it has not.
!
During a real take off, if the engine halts below 500 feet, you are not
allowed to turn and try to glide and land back on the runway. You only
have
enough height to try to turn and land back if you are above 500 feet
when the
engine halts.
! Before a real
take off you have to go through check-lists. A checklists makes you
verify, tune and tighten a list of items. You have to follow a long
checklist
before you enter the runway and a short checklist before you
accelerate to take off.
This is the checklist I follow when I take of the virtual Cessna 172p
on FlightGear. It is very short compared to a real checklist. Anyway I
know I can go into (moderate) trouble if I don't follow it. I had to
build up the discipline to follow it carefully each time:
- Check the wind direction.
- Deploy one step of flaps.
- Click the right mouse button and ensure the mouse is in yoke mode
(+).
- Put on a HUD (h, H, i,
I) or the schematic
instrument panel (P) in order
to know the controls positions.
- Pull the yoke/mouse to 1/2 the pull path.
- Check the yoke/ailerons are centered.
- Keep the left mouse button down and check the rudder is centered
or slightly to the right.
- Keep the Page Up button
down to start accelerating, till the engine RPM is maximum.
Landing
When I was a boy, I had a simple yet fairly good flight simulator on my
Sinclair ZX Spectrum
home computer. I could do everything with it, except
landing. I always crashed the plane, or reached the end of the runway
before stopping.
One day a real pilot saw me trying to land. He had never seen a flight
simulator, but he had no problem to recognize each flight instrument
and ground feature on the screen. He told me what to do. Decrease
engine power, increase engine power, push the nose down, pull the nose
up, turn a little left, turn a little right, get the flaps out... We
made a perfect landing on the second attempt.
Just like for take off, landing
is partly a procedure, partly rules you
have to stick to. You have to adapt constantly.
Same basic rules apply as for take off, yet in reverse order:
- Stay at 70 knots once below
500 feet. Descend towards the runway while
keeping at 70 knots.
- After the final rounding (see below), stay close above the runway
while decreasing speed from
the
70 knots flight speed down to the roughly 55 knots landing speed.
- Touch the runway
with the two main wheels. Keep
the front
wheel from the ground till the speed is below 40 knots.
(If you know what you are doing you are allowed to use a speed a little
below 70 knots: 65 knots.)
Following rules are essential during the
whole procedure of landing:
- Tune the speed using the
yoke/mouse/elevator: push the yoke if you are
flying
below 70 knots, pull the yoke if you are flying above 70 knots.
No
matter this makes you gain or lose altitude (except when this causes a
danger of course).
- Tune the altitude using the
engine throttle. Add power if
you are too low, retract power if you are too high.
- Once approaching the ground,
use the yoke/ailerons to keep the wings
level with the horizon. Turn using the rudder.
- Don't shut the engine down. Only shut the engine down when the
airplane is completely halted on the ground. There are two reasons for
this:
- Any moment you may need full engine power to rise back in the
air.
- Engine thrust enables you to make more precise landings. For
example if you land on a very short runway, you need that precision.
The reason why the yoke/elevator is used to tune
the speed is this method
allows for fast reactions and fine tuning. It is more important to tune
the speed closely than the altitude.
If you are both a little too high and a little
too slow, simply push the yoke a little and both problems will be
solved together. No need to use the throttle. Use your mind...
You have to get aligned with the runway. That means your flight
direction has to match the middle line of the runway (drawing (a)
below). In order to arrive at this, don't aim at the start of the
runway (b).
Rather aim at a fictitious point well ahead of the runway (c). And
begin
to turn gently towards the runway well before you reach that fictitious
point (d). Note the turns and bankings you make for these flight
corrections are often very soft. You wouldn't even notice them on the
turn coordinator. This is one example where you better rely on the
outside horizon line than on the inside flight instruments.
Try to get aligned with the runway as soon as possible. Constantly
apply the alignment procedure. The closer you come to the runway, the
better the alignment should become. At tip: if you see that the two
sides of the runway form an equal angle towards you, like / \ , this
means you are above the middle line of the runway (supposing that
middle line extends in front of the runway). So, if you see the runway
neatly / \ and it is perfectly in front of you; in the middle of your
flight direction; everything's fine. But if the runway is neatly / \
and it is situated to the right or to the left, this means you should
have turned earlier to align. Now you sure are above the middle line
extending from the runway, but you are flying in a wrong direction,
away from that middle line and from the runway start...
My favorite landing procedure for the Cessna 172p is roughly this one:
- Far from the runway, yet
already heading towards it,
start decreasing the
speed and let the plane descend towards 500 feet.
- Check the rudder is neutral.
Otherwise the plane will be braking and more engine power is needed.
(Type keypad keys 0 and Enter to center the rudder if
needed.) If you make corrections using the rudder, keep in mind you may
need a little more engine power.
- Once the speed is below 100
knots, deploy one flaps step (]).
- Once an altitude of 500 feet
is reached, keep that
altitude.
Once a
flight speed of 70 knots is reached, keep that speed. (If in doubt,
keep above 500 feet.) The exact altitude doesn't matter much provided
it
is stable. But stick
to 70 knots.
- Control the
altitude using the engine. Add a
little engine power if you are too low (type a few Page Up), retract
a little power
if you
are too high (type a few Page
Down).
Allow
the altitude "plenty" of time to get right. No need to get exactly 500
feet or whatever altitude you choose, but try to keep it stable. (Be
foreseeing: add a little engine power even while the altitude
decreased only very slightly. Retract power even while the desired
altitude is not yet attained...) You need an engine RPM of
roughly 1,900. That's the minimum
of the
green zone right of the tachometer. This should keep you in a stable
horizontal flight at 70 knots, provided you lowered one step of flaps.
Do not try to tune in exactly
1,900 RPM. Tune what suits to keep a stable altitude... Try to
make frequent little tunings, instead of seldom heavy tunings. Try to
foresee what is going to happen. Best is to add or retract a little
power in advance.
- Tune the trim to get the average position of the yoke/elevator
centered. This is not mandatory on the simulator, yet that way you
better mimic piloting a real airplane. On the Cessna 172p (with no
load) this means trim on neutral.
- Be firm
with the flight speed. Keep a tight and quick control on the yoke/mouse
to keep 70 knots. If the speed is lower than 70 knots, push the yoke to
gain speed (no matter you lose altitude). If you are above 70 knots,
pull the yoke to lose speed (again, no matter this makes you gain a
little altitude). Don't panic if the speed rises to 75 knots or
decreases to 65 knots. But keep in mind you can really get in trouble
if you approach a short runway at 80 knots. I manage to keep the speed
between say 68 and 72 knots.
- Fly at constant speed and
steady altitude towards
the runway. 70 and 500. Keep trying to align
with the runway. You will *never* be perfectly aligned. You have to go
on aligning till the airplane halts on the runway...
- Now you are at a low flight speed of 70 knots, no
more use the ailerons/yoke to turn. Instead use the ailerons to keep
the wings horizontal. Turn using the rudder (Keypad keys 0 and Enter). The rudder can seem an odd
device for this purpose yet you will get used to it. Move the rudder
only a few key hits to the right or to the left. Be patient. Make one
key hit at a time and allow the airplane to stabilize before you
possibly make another key hit. (When I started making landings, I found
the rudder to be hectic and I preferred to use the ailerons to turn. As
experience build up, I finally found out that turning with the rudder
allowed for more precise and comfortable adjustments.)
- The airplane may oscillate a
little. Don't bother. Just
keep in
control using the yoke.
- You're flying at constant
altitude and 70 knots speed. Once the beginning of
the runway passes under the engine
cover, it's
time to take things up seriously. This is shown in the picture below.
(Whatever altitude you are flying, once the engine cover begins to eat
the runway, you are at a correct angle towards the runway start.)
- Type ]
two times, to
deploy the full three flaps steps.
- Immediately push the yoke
forwards, to make the airplane plunge to the ground. Indeed, the full
flaps deployed make the plane brake. You plunge towards the runway to
land, of course, but also to keep the speed at 70 knots.
- Decrease the engine power. 1/4 the maximum is often fine. The
Cessna 172p needs even less. I tend to decrease the engine power
throughout the dive, to end with almost no power. The possibility to
add engine power is necessary for your safety and for the precision
of the landing, but also the possibility to decrease the engine power.
So I try to make my dives a way that I keep the engine at some decent
power level throughout the dive. If a dive obviously begins with the
need to decrease the power to minimum, there is a risk you touch the
runway far beyond its start.
- Watch the
speed
indicator like it if was your heartbeat. Control the speed using the
yoke/elevator.
- The dive makes you head
towards the runway. You will
soon
become aware that the plane is going towards a point of the runway
much further than the start of the runway. There is nothing
wrong
with that on a long runway. Yet you should train to land on short
runways. In order to correct the dive and head towards the start
edge of the runway, decrease the engine power. (On the Cessna 172p
this often leads to power to minimum, while on most other airplanes
you keep some power tuned in.) The picture below is a snapshot
from a
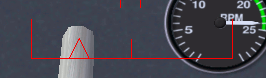
good dive. (Note the vertical speed indicator shows -500 feet/minute. I
never use that indicator. I solely aim at the runway edge and
its 12 white strips. Anyway, -500 feet/minute is the right descend
speed...)
- Closely keep the speed at 70
knots by pulling and pushing
the
yoke. Calmly increase and decrease the engine power in order to
head the
plane towards the starting line of the runway. Don't bother to aim
exactly
at the start of the runway. It doesn't matter if you arrive a few feet
before the runway start or much further after it. Provided
you arrive at
70 knots.
- Keep aligning with the runway, using the rudder pedals
to turn (keypad keys 0
and Enter). Keep the
wings level with the horizon using the mouse/yoke/ailerons. (Use the
ailerons
to turn only if an emergency occurs and you need to make fast and steep
turns. Then you probably need to abort the landing and get back to
altitude (see below).)
- If you suddenly realize you will arrive
really far before the
beginning of
the runway, possibly retract the flaps to one step ([). You can also let
the engine roar to maximum power for a few seconds. If you followed the
procedure you shouldn't need to do such extreme things... (At any time,
if you feel
things are going wrong, retract the flaps to one step, throttle
to full
engine power, put the trim on
neutral and gain back altitude
(keep the
speed above 70 knots). Whatever wrong happens -- you arrive aside from
the
runway, too far before the runway, at a wrong speed, a swarm of birds
is passing, whatever -- abort the landing. Get back
to altitude and
retry.)
- The "rounding" is the most
impressive part. You are like
going to
crash on the runway. Yet you will pull the yoke/mouse
before it's too late. Don't pull on
the yoke too
early. Don't pull on the yoke too firmly. Once you are really close to
the runway (for a beginner: once you are convinced it's too late and
you are going to smash into the ground), pull the yoke gently and
bring the plane in a steady flight above the runway. That's the
rounding. (During the rounding, ground effect
contributes to your security
and ease.)
- It is often best to reduce the engine power to minimum during the
rounding.
- Go on using the rudder
pedals (keypad 0
and keypad Enter)
to keep aligned with the
runway. Use the yoke/ailerons to keep the wings level with the
horizon (so both left and right wheels will touch the runway at the
same
time).
- Now you're flying close
above the runway (in ground effect). Throttle the engine
power to
minimum if it wasn't already done (this is mandatory). Deploy full
flaps if they weren't already
deployed completely (this is not mandatory on a long runway). (Don't
shut the engine down. Just throttle to minimum power. It still can
happen that you suddenly must take off again and need full power in a
few seconds.)
- Keep the plane flying close
above the runway. As the speed
decreases
from 70 knots down to 50 knots and below, keep pulling more and more on
the
yoke/mouse, steadily. Keep the plane in
the air while ensuring it stays really close to the surface of the
runway. Steadily lift the nose, while the plane slows down, up to quite
a strong angle. Make sure
the plane does not gain back
altitude (don't look at the
instruments, look at the outside). You
really have to avoid the plane rises back in the air. Indeed it would
do that at a speed below
70
knots... (You shouldn't need to pull the yoke
more than 1/2 its maximum.)
- Don't land the plane. Let it land by itself, once the speed is
too
low and the nose is high up in the air. The plane renounces to
fly, it calmly sinks in and the two rear wheels touch the runway. If
you don't hear the wheels hit the runway and the wheels
nevermore leave the runway, you probably made an optimal landing. This
also makes the
front wheel stays above the runway while the two rear wheels touch.
- Once the rear wheels roll on the runway, retract the flaps. That
way the wings will lift less and the plane will be more firmly on the
ground. (My favorite way to land the airplane is to let the flaps down
and keep pulling on the yoke while the airplane is rolling. That way I
get maximum braking. I suppose this is an example of the difference
between a simulator and reality. Using my way the airplane risks to get
back in the air any moment and it is very sensitive to blows of wind.
If I made real landings, maybe I wouldn't dare do this...)
- When the plane is rolling, an optimal position for the
yoke/elevator seems to be pulled 1/2 of the total way.
- Use the rudder pedals to keep the
plane rolling in the middle of the
runway
and straight while the speed decreases. This most often leads me to two
keypad Enter hits to the right
of the center position.
- Once rolling at a speed below 40 knots, the nose will go down
automatically. Help it by pushing
the yoke/mouse calmly, back to neutral position. The front wheel now
must touch the runway.
Beware: check the rudder position first. If it is
too much to the left or to the right, the plane will turn violently
once the front wheel touches the runway. The plane may even fall aside
and
hit the ground with a wing tip. (The rudder slightly to
the right; two keypad Enter
hits, seems an optimal position.)
- Now the front wheel is on the ground, use the mouse to control
the rudder. Keep the left mouse button down and forget the keypad keys.
Maybe just check the ailerons and elevator positions are sound before
you press the left mouse button. (Actually if everything went correctly
and there is no crosswind, you shouldn't need to steer the plane using
the rudder.)
- Once the front wheel is on
the ground, you are allowed to
use the brakes. Your choice. Keep the b
key down. Be
prepared to release it should a problem occur.
If you forgot to almost center the rudder, braking can go really bad.
Once the plane is halted or at very low
speed, you can release the b
key (if you used
it) and add a
little engine power to taxi to the parking or hangar.
To shut the engine down:
- Engine throttle to
minimum (hold Page Down
down for a
while).
- Pull the mixture lever to
halt the engine (mouse in normal pointer
mode, click on the left of the red mixture lever to pull it
out).
- Rotate the magneto switch to
OFF (a few hits on {).
To set the parking brakes in, type B.
You must be mentally prepared to abort
landing
anytime. Whatever happens: an order from the control tower, a wrong
speed or landing angle, a wrong alignment with the runway, a strong
blow of wind, birds flying over the runway... retract the flaps to one,
push the engine to maximum, center the trim and get
back to high altitude. Then either you restart the landing
procedure or you go for another airport. The pride of a pilot is to
make only safe landings.
Don't try to find "the ideal distance" to start diving to the runway.
The procedure above proposes you start diving when the white engine
cover starts eating the runway edge (provided you fly at 70 knots with
one flaps step) (the altitude doesn't matter). Best is you train
to land while starting the dive earlier and while starting to dive
later. You need to be trained to increase or decrease engine power
according to what is needed. During a real landing, depending on the
airplane's weight, the wind speed and other random things, the "ideal"
moment to dive is unpredictable. As experience builds up, you will
better feel the right moment.
If you want to make things simple for your first landing trainings,
make use of the
fact the runway at
KSFO is very long. Wait a little more before you begin the dive: let
the nose "eat up" the whole length of the leading part of the runway
(let the successive pairs of white strips on the runway disappear below
the airplane nose). Then lower the flaps
to
three steps and decrease the engine to minimum. Dive to keep the speed
around 70 knots and try to keep aligned with
the runway. You will end the dive quite far beyond the runway
start and at a high vertical speed, but who cares. Make the final
rounding. Keep aligned with the runway and
try to fly close above it. Keep
pulling more and more on the yoke/mouse, to keep the airplane flying.
Yet avoid it rising in the air. Till the wheels touch the ground. Then
just keep the airplane on the runway, using the rudder. Once
the speed is below 40 knots, push the
yoke/mouse and keep key b down
to brake.
If you are a newbie, you probably won't succeed to apply the procedure
perfectly. My advice: invent your own, more simple procedure. Then
regularly come back to the procedure listed here and read it again, to
get hints and
ideas to better your procedure. Till you get it. Also best read other
landing procedures. Send me a mail if you find interesting differences.
Analyze your own procedure. If it implies to fly at very low speed, it
is dangerous because a blow of wind from the rear will make the plane
fall. A probable problem with your procedure is the plane needs a lot
of runway length to land. If you look at the runway start you will see
there are successive groups of white stripes. I land the Cessna 172
always well before the last group of
stripes. If you are a real beginner, your procedure surely will make
the
plane tilt over or crash once in a while. The procedure listed here is
safe.
Train your procedure, again and again. The more you train it, the more
you will become able to use the one listed here. That's the way I
learned to land...
!
In a real airplane, you
must keep in touch with the
control tower constantly while landing. You will be contacted by the
control tower or you have to contact it in some key parts of the
landing. If you don't contact the control tower just after landing, an
emergency rescue team is immediately underway. If there is no good
reason you didn't contact the tower, you will really be in trouble.
Maybe you'd like to train landing without having to take off
and circuit in order to head for the runway and land. Type the command
line displayed below in a terminal window to start the simulator in
flight and heading for the runway. The airplane is placed 6
miles ahead of the runway, at an altitude of 1000
feet and a speed of about 120
knots.
fgfs --offset-distance=6
--altitude=1000 --vc=120
Possibly add --timeofday=noon
--geometry=1024x768
parameters if you need daylight and a bigger window (choose anything
you
need instead of 1024x768 (I favor 1200x900 an my screen)). FlightGear
command
line parameters are listed in http://www.flightgear.org/Docs/InstallGuide/getstartch4.html#x9-330004.4
(Note the parameters above make the airplane have some trim tuned
in. Yet you need another trim tuning during the
horizontal steady flight towards the runway. See the chapter above,
about the trim. If
in doubt, just center the trim. On the Cessna 172p, a centered trim
seems the right position.)
Once you are trained, you no longer need to do a long horizontal flight
at 500 feet and 70 knots to get to the runway. Instead you can descend
all the way from your flight altitude and at a higher speed. You should
be able to get at 500 feet and 70 knots a short while before the final
dive.
Landing at 65 knots instead of 70 knots allows to use a much shorter
runway length. Yet to benefit from this you better train landing at 65
knots. It is quite different from landing at 70 knots.
The landing speed varies according to the load of the airplane. The
more load of petrol, passengers and freight, the higher the optimal
landing speed will be.
How to fly when there is wind
Think of a hot
air balloon. Think of it as being in the middle of a
gigantic cube of
air. The cube of air may move at high speed compared to the ground,
anyway the balloon
itself is completely static in the middle of the
cube. Whatever the wind
speed, persons aboard a hot air balloon
experience not the faintest blow of wind. (To pilot a hot air balloon
you bring it at an altitude where the wind blows in a direction that
more or less suits your needs.) The same way, an aircraft flies in the
middle of a gigantic cube of air and only refers to that cube of air.
The motion of the cube of air compared to the ground doesn't bother the
aircraft.
You, the pilot, on the contrary, do bother for the speed of the
surrounding air compared to the ground. It can make you drift to the
left or to the right. It can make you arrive at your destination much
later or much sooner than planed.
When the wind blows in the same direction as you fly, the speed of the
wind adds itself to the airspeed of the plane. Hence you move faster
compared to the ground. You will arrive earlier at your destination and
have less time to enjoy the landscape. (It sometimes happens that a jet
airliner flying with a strong wind from the rear, moves faster than the
speed of sound compared to the ground. Though it doesn't brake the
sound barrier.)
When the wind blows in the opposite direction you fly (towards the nose
of the plane), the speed of the
wind subtracts itself from the airspeed of the plane. Hence you move
slower compared to the ground. You will arrive later at your
destination and have more time to enjoy the landscape. (Some slow
airplane flying against strong wind can even seem to fly backwards,
because the speed of the wind is faster than the flight airspeed of the
airplane.)
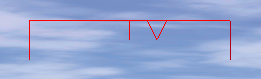
The two cases above are quite simple. More complex is when the wind
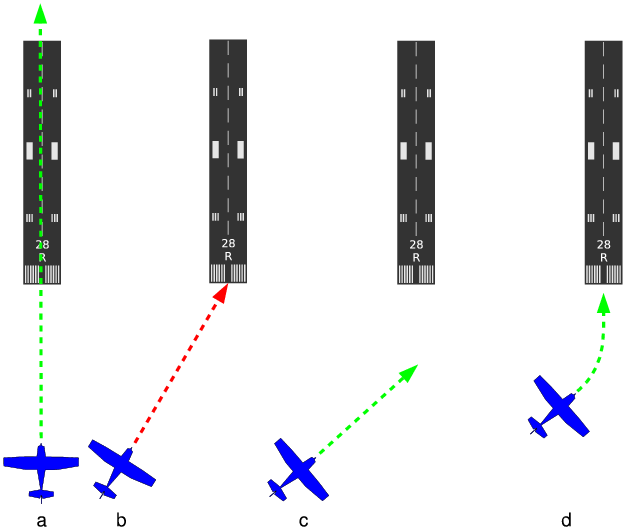
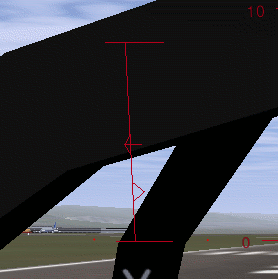
blows towards the side of the airplane. Look at the pictures below.
- On picture (a) there is no wind. The pilot wants to reach the
green hill situated to the North. He heads for the hill, towards the
North, and reaches the hill after a while. When there is no wind, you
just head towards your destination and everything's fine.
- On picture (b), the pilot keeps heading to the North. Yet there
is wind blowing from the left; from the West. The
airplane drifts to the right and misses the hill.
- On picture (c), the pilot keeps heading towards the hill. This
time he will arrive at the hill. Yet the plane flies a curved path.
This
makes the pilot loose time to get to the hill. Such a curved path is
awful when you need to make a precise navigation. (Note something: the
airplane tends to get into the wind, like a weather vane.)
- Picture (d) shows the optimal way to get to the hill. The plane
is directed to the left of the hill, slightly towards the West. That
way it compensates the wind and keeps on a straight path towards the
hill. It will need more time to reach the hill than if there was no
wind, anyway this is the best attitude. (Note something: the solution
is to let the airplane head a little bit into the wind, like a weather
vane would.)
How much to the left or to the right of the object must you head? At
what angle? Serious pilots use tight geometry and trigonometry
computations to get near
exact and optimal angles. Yet I wouldn't fly a virtual Cessna 172p if I
had to
do such dry things. You need no computations at all to fly roughly
straight. The trick is you must keep your eyes on the object you fly
towards. You know you will head the plane in a direction to the left or
to the right of
the object, but you don't need to know the angle. Just keep your eyes
on the object. Get aware you are drifting leftwards or rightwards. Then
let your instinct slowly head the plane to the right or to the left to
compensate the obvious drift. When you begin
training this, you need to force your instinct a little bit and think
of what you are doing. Very soon this will become automatic, just like
when you learned to fly straight. You will no more keep the plane
headed towards the object. You will rather keep it flying towards
the object. The picture below shows a flight towards the top of the
little
mountain ahead. Wind blows from the right. I just look at he
mountain top. And I let my hands head the plane to right of the
mountain, without really thinking about it:
The faster the flight airspeed compared to the wind speed, the less the
wind will influence.
How to take off when there is wind
Main recommendation to take off is you must find a way to accelerate
facing the wind; with the wind blowing towards the nose of the
airplane. Before most
runways are build, statistics are made about the wind at that location.
The runway orientation is chosen so it aligns with the wind most
often. Lots of airports
have two runways at different orientations
because the wind sometimes blows in one of these directions and
sometimes in the other direction. The location of an airport is often
chosen because at that place the wind often has a stable direction and
speed.
Take off with a faint wind blowing towards the rear of the airplane,
say 1 knot, for sure
is no problem. Yet above a few knots you can get into trouble. With a
10 knot wind blowing from the rear, the front wheel will rise at the
usual 40 knots airspeed, but that makes 50 knots compared to the
runway. What matters is the speed the front wheel roll over the runway,
not the airspeed... If a problem occurs and you are still rolling at 60
knots on the runway, the consequences will be more dramatic. To end
with, you will need much more runway length and have less opportunities
to abort the landing.
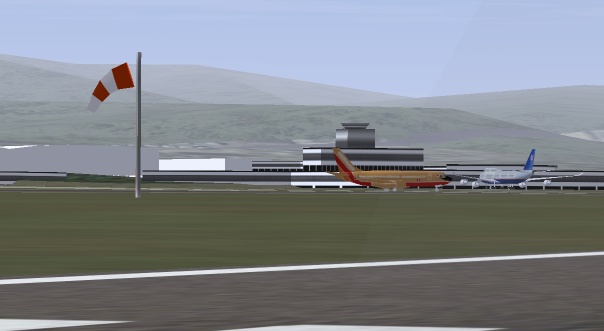
The main way to know the wind direction and speed is to go to the
control tower or ask the control tower by radio. A necessary and
complementary tool are the windsocks at both
ends of the runway. They show the wind direction
and speed. The longer and the stiffer the windsock, the more wind there
is. The windsock on the picture below shows an airspeed of 5 knots:
So, you have to choose a runway start that allows you to
take off with the airplane facing the wind. In real life you are not
always allowed to do this. Either there is no runway aligned with the
wind or the control tower tells you to use another runway. Then you
have to take off under crosswind; the wind blowing towards a side of
the airplane.
Basically, you can use the exact same procedure as listed above for a
take off when there is no crosswind. Yet you have to be aware of
several important facts listed below. To train this, start FlightGear
with the parameter --wind=0@10
which implies a wind of 10 knots blowing from the North (direction 0).
If you take
off from the usual San Francisco KSFO airport heading to the West, this
makes the wind blow from the right.
- You will have to push the rudder at quite a strong angle to stay
rolling aligned with the runway. Keep the rudder at that angle once the
front wheel leaves the ground and a little later once the rear wheels
leave the ground.
- Say the wind is blowing from the right. You would think you have
to push the right rudder pedal, to head the airplane a little bit into
the wind, to compensate for the leftwards push of the wind. Well you
have to do the exact opposite: push the left rudder pedal. This is
quite unnatural yet that's life. The reason of this is the rear
vertical stabilizer is pushed by the wind leftwards. The plane reacts
like a weather vane and heads in the wind. The plane as a whole turns
to
the right, with quite a strong force. You have to compensate by pushing
the rudder to turn to the left. So, you take off with the ruder pedals
pushed to the left. The picture below shows a rudder angle during a
take off with a 10 knots crosswind blowing from the right:
- The airplane will tend to bank leftwards. Hence you will have to
push the yoke/ailerons to the right. Actually you best place the yoke a
little to the right before the wheels start leaving the ground. (Best
is to push the yoke to the right from the start on. Indeed this is the
best way to taxi safely under a crosswind blowing from the right.) The
picture below shows an appropriate yoke/ailerons position, while
taking off with that 10 knots crosswind blowing from the right.
- The airplane will rise in the air much slower. The vertical speed
will be quite weak. This is because the rudder is at a a strong angle.
The airplane moves through the air with its right flank and brakes. You
have to wait till the rudder is centered before you get the regular
vertical speed. Center the rudder very slowly, a little angle step at a
time. Meanwhile, using the yoke/ailerons, gradually head the airplane a
little bit in the wind, to keep flying aligned with the runway. Wait
till you are above a few hundreds feet before you start centering the
rudder.
Why do you keep the yoke to the right and the rudder pedals to the left
once the airplane rises in the air? This can seem odd. It's quite
logical that way the airplane will fly straight. The ailerons and the
rudder compensate each other and the airplane turns neither to the
right, neither to the left. But again, why do this, why not simply let
the yoke/ailerons and the rudder centered? The airplane will fly
straight too and be far less braked. The reason why we do this is the
ailerons keep the airplane banked to the right; towards the direction
the wind is blowing from. Hence, the huge force on the wings, that
keeps the airplane in the air, that huge force is now slightly directed
to the right. In normal circumstances this would make the airplane move
slowly sideways to the right, at 10 knots speed... Currently, it
compensates for the 10 knots wind and keeps the airplane above the
runway. So despite the wind, the airplane stays headed towards the
runway end and stays above the runway middle. Everything's fine (except
for the braking).
To me, 10 knots wind is a maximum to take off the Cessna 172p safely.
How to land when there is wind
You land the Cessna 172p under crosswind the same way you take off:
- Try to land with the wind blowing towards the airplane face. Bear
in mind the wind blows the airplane away from the runway start. So
start the dive later, when the engine cover already ate some length of
the runway.
- Under crosswind, use the exact same rudder and ailerons tuning as
for take off under the same crosswind. Train this by taking off and
landing under crosswinds. When the wheels leave the ground
and you find the appropriate yoke/ailerons angle, note down the rudder
angle and the yoke/ailerons angle. Center the rudder and ailerons
during the flight and make a circuit to land back. During the landing,
when you fly at constant 500 feet altitude and 70 knots speed, knowing
the crosswind is the same, tune in back the rudder and ailerons angle
that where optimal during take off.
Under high crosswind, hence with a strong rudder angle, the plane
brakes a lot. This implies two things:
- During the approach to the runway, at constant 500 feet altitude,
70 knots speed and 1 flaps step, you need much more engine power to
keep the altitude stable.
- Once you dive towards the runway start, keep in mind the plane is
braking. So you don't need to deploy additional flaps steps. Just
decrease the engine power.
Landing that way is quite comfortable, despite the crosswind. You just
have to be a bit more careful with the rudder once the airplane rolls
over the runway. And best keep the ailerons as if turning towards the
wind.
Note such a landing, with a steady crosswind, is unrealistic. In the
real world the wind varies quickly. You get sudden increases and gusts
of wind. The control tower just tells you by radio the maximum speed of
the
gusts. You have to adapt constantly during the landing, to
react to the turbulences and gusts.
As for the take off, 10 knots wind seems a maximum to me. (Should you
ever have
to land under heavy wind, say 25 knots or more, and there is no runway
aligned with the wind, maybe best don't land on the runway. Or don't
try to align with the runway. Align exactly with the wind and make use
of the fact you need less ground length to stop. When the plane is
going to stop keep the rudder pushed. Don't try to taxi. Simply push
the parking brakes in, push the trim and get help to latch the airplane
to the ground. In fun mode, landing the Cessna 172p under 70 knots wind
is great. You simply let it descent to the ground vertically. This is
quite unrealistic because at such a wind speed there are tremendous
turbulences close to the ground.)
The technique described here is the slip landing.
Another crosswind landing technique is the crab landing.
How to taxi when there is wind
Under 10 knots wind the Cessna 172p seems not to need particular
precautions when taxiing. Yet any sudden increase in wind speed can
tilt it and tumble it over. So best apply the recommendations whenever
there is wind.
To train taxiing on the ground when there is wind, ask for a strong
wind like 20 knots. Such a wind can tilt the plane and blow it away
tumbling any moment. One single error during taxiing and the plane is
lost.
Main rule is you must push
the yoke towards the wind. This deserves some physical
explanation:
- When the wind is blowing from 12 o'clock, this is quite logical.
The yoke is pushed (towards 12 o'clock) and the elevator makes the tail
rise a little. That's the most stable position to avoid the plane be
tilted by the wind.
- When the wind comes from 10 o'clock, pushing the yoke towards 10
o'clock makes the elevator is close to centered. The elevator almost no
more trades in. Now the most important part is played by the ailerons.
The left aileron is upward and the right aileron is downward. This
pushes the left wing down and lifts the right wing. Again, that's the
most stable position to avoid the plane be tilted by the wind.
- When the wind blows from 8 o'clock, you would think you should
invert the position of the ailerons, to keep the left wing being pushed
down. Hence you should push the yoke to 4 o'clock. Wrong! Keep pushing
the yoke to 8 o'clock. The reason is the downward position of the
aileron on the right wing makes it act like a slat. This increases the
lift on the right wing and this is all we want. Symmetrically, the
upward position of the left aileron decreases the lift of the left wing.
- When the wind comes from the rear, from 6 o'clock, the yoke is
pulled (towards 6 o'clock). The upward position of the elevator tends
to make the tail be pushed down. Once again this is the best. Strong
wind can push the tail against the ground. This is impressive but the
tail is conceived to withstand this.
Accept the plane nose can be tilted and the tail pushed against the
ground. Keep cool. This can be impressive yet there is nothing
dangerous with it. Go on using the brakes, rudder and engine to move
the airplane.
If you want to move towards the wind, you will need more engine power.
When the wind blows from the rear you may need no engine power at all.
Always keep the engine power to the minimum needed.
Especially when turning, move very slowly. Make little changes at a
time. Take your time and closely survey the yoke angle. Constantly keep
it pushed towards the wind. Constantly try to reduce the engine power.
Keep in mind using the brakes too firmly may shortly tilt the plane at
an angle that allows the wind to tilt it and blow it away.
The autopilot
An autopilot is
not an "intelligent" pilot. It just takes over simple and wearing parts
of your
work as a pilot. You still are the sole real pilot aboard and have to
keep aware of everything. Be prepared to shut the autopilot down.
During take off and landing, relying on the autopilot would be
suicidal, because you have to keep an immediate control on every
function of the airplane. (Dumb autopilot systems are reported to cause
less accidents than smart ones with artificial intelligence inside.)
The autopilot is that little rack to the right of the yoke:
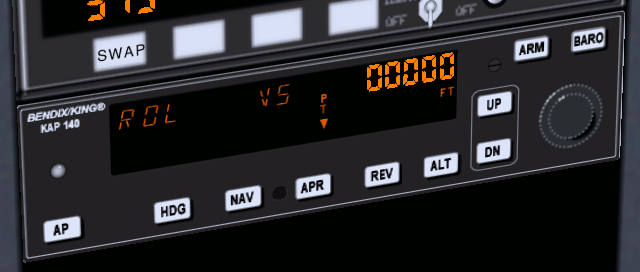
Switch it on by pressing its AP button
(standard mouse mode). The autopilot then controls the roll. It keeps
the wings level with the horizon. This is displayed in the picture
below by the "ROL"
marking. To switch the autopilot down press again on AP.
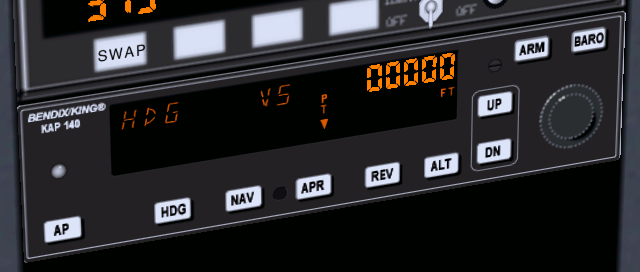
If you press the HDG button
the autopilot will try to keep the plane flying towards the direction
tuned on the directional gyro by the red marking (see the chapter about
direction). "HDG"
stands for "heading". Press again on the HDG button
to get back to roll control mode (or AP to
switch the autopilot down).
The buttons ALT,
UP and
DN are
used to tell the autopilot either to control the vertical speed (VS)
or the altitude (ALT).
From here on you maybe better study the document used by the author of
the autopilot system in
FlightGear: https://www3.bendixking.com/servlet/
com.honeywell.aes.utility.PDFDownLoadServlet?FileName=/
TechPubs/repository/006-18034-0000_2.pdf
Security
Security is first of all a matter of common sense. Avoid to land with
the landing gear retracted. Fill the reservoirs before take off and
don't let them get empty in flight. This may seem funny
recommendations,
the fact remains I made several landings on the aircraft belly when I
started using the flight simulator. I got angry on myself and now it
nevermore happens that I forget such a simple and essential thing. In
real life you are not allowed to land airplanes on the belly in order
to get angry
on yourself. I suppose it is a part of the role of the monitors to make
you feel the angriness *before* your first solo landing. I suppose they
don't let somebody fly on his own till they feel the angriness is
rooted deeply enough in him. People who cannot cope with this are not
meant to become pilots.
There are many more vital details than the landing gear and the fuel.
That's why checklists exist. There are checklists for
all kinds of normal or emergency situations. There are long checklists
and short checklists. This link provides checklists for the Cessna
172p and for other airplanes: http://www.freechecklists.net
. Those checklists refer to much more levers, buttons and triggers
than talked about in this tutorial. There is nothing complicated in
those checklists provided you learned what all those little things
are. For example one item is you have to verify the seats backs are
upright.
You have to learn to cope with stress. Wherever I get access to
computers I try to install FlightGear. To me the computer industry
should focus solely on building computers for FlightGear. Secondary
tools like browsers, mailers, spreadsheets and the like, should be
regarded as optional sub-functions of FlightGear. Once the installation
is finished, I make a demo flight. Strangely, most people simply don't
care about what I am doing. They just go on talking, asking questions,
requesting my attention... What's more I'm often not in the most
adequate position toward the screen, the keyboard and the mouse. It
becomes almost impossible to fly correctly, especially to land.
Basically there are two possible attitudes. The first one is I get
silently angry on the disturbing persons, I stop the demo and I
consider it's their fault if I cannot succeed my flight. The second
attitude is I breath deeply and calmly, I find ways to go on managing
the burdens and the problems, I don't get angry on anybody, I claim
nothing to be responsible for anything, I renounce to make a perfect
demo flight and I focus on making a mediocre yet secure landing. The
advantage of the first attitude is that you feel comfortable about your
superiority on FlightGear-unaware persons. The disadvantage of the
second attitude is that you
have to endure the humiliation of an ugly landing and the people around
going on talking and requesting your attention. The advantage of the
second attitude is that in real life, on a real airplane, it allows you
to stay alive.
Communication is a basis for security. That means communication with
the
technicians, with the control tower, with your copilot, with the
passengers and especially with yourself. You have to constantly gather
data about the traffic, the meteorology and the state of mind of your
passengers. You have to constantly inform the control tower and obey
the instructions it sends you in return. You have to keep your
passengers in an acceptable mood and at the same time you have to
obtain they let you focus on your tasks when this is necessary. Lots of
airline accidents
occured because of a lack of communication between the pilot and other
crew members. That has been called "the Superman syndrome". Once the
problems start, the pilot focuses on his way to solve the situation.
Either the copilot does not understand what the pilot is doing or he
becomes aware of a danger the pilot did not realize. This results in
contradictory commands sent to the airplane controls, shouting, up to
fist fighting... till the final crash of the airplane. An important
part of the training for modern pilots is to learn to communicate with
the other crew members under high stress. They learn to go on
communicating and how to do that a short and efficient way. (I was once
told this anecdote: a monitor and a trainee were performing landings.
The trainee was a strong guy with muscles like truck tires. At one
moment the landing path appeared to be wrong. The monitor asked the
trainee to release the commands so he could take them over. There is
nothing wrong with failing a landing. Monitors themselves sometimes
fail a landing, abort and restart a new landing. But the trainee
panicked and crispated his hands on the yoke. The monitor could do
nothing. The consequence was a damaged landing gear.)
There is no room for luck in real aviation. When you train to become a
pilot, almost every possible situation is put into practice at least
once. For example a monitor makes you take off with a heavily loaded
airplane and suddenly shuts the engine down. You have to train to fly
and
land with a random airplane control or indicator out of order.
FlightGear
allows to reproduce some of these trainings. You can request
flight instrument failures using FlightGears' menus or command options.
A really bad
instrument failure means the instrument still
seems to operate correctly. Yet it doesn't, and what it does or
displays endangers you. While training you can decide to no more use a
given instrument or control. For example you can glue a
sticker on your screen to hide away an instrument. Best is you ask a
friend to configure a failure without you knowing what he did.
This heavy training and the numerous
precautions and rules are the reason why so few accidents occur. In
most cases, even a severe problem does not lead to an
accident. Accidents are often due to the unlucky addition of several
different problems.
The picture below shows the artificial horizon indicator. I hardly
never use it. I fly looking at the real horizon. Anyway the artificial
horizon saved me more than once on the simulator. When you penetrate by
mistake in a cloud or a bank of mist, you suddenly get a white outside.
There is no more way to keep the plane flying level, except by using
the artificial horizon. You may argue this is due to the lack of
feedback
own to the simulator. You're (dead) wrong. The same problem occurs on a
real airplane. Quite many of the (very few) accidents in little
airplanes
like the Cessna 172 or the PA-28 happen that way. It is prohibited for
a pilot with no IFR license to enter a cloud. Some do it anyway. Or
they get caught in a rise of mist the control tower didn't warn for.
The airplane banks and in
two minutes time it goes flying upside down. The pilot
is unaware of this. Even worse: some instruments seem to get mad, with
no obvious reason. A crash is unavoidable. I learned the reflex
to focus on the artificial horizon, the altimeter and the directional
gyro. When this happens the plane is often already severely banked. I
keep calm and I use the instruments to maintain the plane in a sound
flight.
It will oscillate a lot but serious problems will be avoided. Either I
will wait till I get out of the cloud or I will gain or loose altitude
to get out of the cloud layer. I strongly advice you train this using
the simulator. Best is you make a complete IFR training.
One thing you have to train for your security is landing on very short
distances. Some flight incidents, like an engine failure or a sudden
change in the weather, can force you to land on the first strip of flat
land you encounter.
The HUD allows to fly and land more easily, with less stress. It also
allows to optimize what you are doing and this is good for security.
For example it allows to touch the ground very close after the
beginning of the runway. That way you have the whole length of the
runway to brake. (A HUD is available for every aircraft on FlightGear,
even the 1903 Wright Flyer. In real life, few little civil airplanes
contain a HUD. It is too expensive and too recent.)
There are some strong differences between a flight
simulator
with minimalistic control hardware and a real airplane. The fact the
mouse exerts no counterforce, the
fact you don't feel the vibrations and forces inside the airplane... On
one hand, some aspects of flying are made easier on the simulator.
On the other hand, a real airplane constantly gives all sorts of
valuable feedback you don't get with a simulator. One thing is common
to
the simulator and the real airplane: while landing you'd wish you had
four arms and two more brains.
FlightGear contains bugs. Consider those problems as a training for
real aircrafts.
Problems on real aircrafts are not the same. But there are problems.
When FlightGear suddenly puts you in a critical situation due to a bug,
consider this as a training. Try to solve the situation fast and
efficiently while keeping calm. It's not a bug, it's a feature!
The handbooks of airplanes contain procedures and checklists for
emergency situations. It sometimes happens that the adequate reaction
to
a problem is exactly the opposite for two different airplanes. That's
one reason airline pilots are not allowed to fly different airplanes at
the same time. If they choose to go flying another type of airliner,
there are imposed to stop flying for a lengthy period, during which
they will practice the other type of airplane on simulators. The wide
range of aircrafts available under FlightGear allows you to experiment
with this.
How to land the Cherokee Warrior II
To write this chapter I just gathered some data about the Cherokee
Warrior II and I made experiments with FlightGear. Don't consider this
as a tutorial but merely as hints to toy with the virtual Cherokee
Warrior II.
On Linux you get the
Cherokee Warrior II (or PA-28) with the --aircraft=pa28-161
command line parameter. The Cherokee Warrior II has some
advantages upon the Cessna 172p. Thanks to its low wings it is far less
sensitive to crosswind. Fully extended flaps are more braking and
allow to land on a much shorter distance.
Take off is the same as for
the Cessna 172p (in FlightGear. In real life their take off checklists
are not exactly the same).
You have to get
used to some minor differences of the Cherokee Warrior II for the
landing:
- During the steady horizontal flight before landing, the trim must
be pulled a little below neutral in order to get the yoke oscillating
around neutral.
- The optimal tachometer RPM during landing is at a lower RPM than
the tachometer green zone. Roughly, keep the needle vertical.
- Only put one more flaps step (which makes two flaps steps
deployed) when the dive towards the runway begins. Don't decrease the
engine throttle too much.
- If you keep it to two flaps deployed during landing, the hover
above the runway
and the final roll will be similar to the Cessna 172p. Yet if you
put the third flaps step in (after the final
rounding), the plane will brake firmly. It will very quickly touch the
runway then come to a near halt. Be prepared to lower the front wheel
very soon. (It is possible to use the third flaps step during the dive
towards the runway, instead of tuning the engine power down.
Oscillating between two steps and three steps allows to aim the runway
start. Yet keep two flaps steps and tune the engine seems
easier.
An interesting stunt is to fly stable till nearly above the runway
start, then tune the engine to minimum and deploy three flaps steps.
The
plane almost falls to the runway. It's impressive but it works.)
In real life, an advantage of the Cessna 172p upon the Cherokee
Warrior
II is the fuel reservoirs of the Cessna are located in the wings close
above the center of the plane and higher than the engine.
What's more an automatic system switches between the reservoirs. That
makes you almost don't have to bother for the way the fuel gets to the
engine in flight. On the contrary, on the Cherokee Warrior II the
reservoirs are located separately, on both wings and lower than the
engine. That means you have to constantly switch between the two
reservoirs in flight. Should one reservoir become much lighter than the
other, this would destabilize the airplane. The fact the reservoirs are
lower than the engine means you have to control the fuel pumps and the
backup fuel pumps.
Some links:
How to take off and land the Piper J3 Cub
Use the --aircraft=j3cub
parameter to get the Piper J3 Cub on Linux.
The Piper J3 Cub
is a very different airplane from the Cessna 172p and
the Cherokee Warrior II. The Cessna 172p and the Cherokee Warrior II
are front wheel airplanes while the Piper J3 Cub is a tail wheel
airplane. Stall speed seems to be a little below 40 mph
(the Piper Cub's airspeed indicator is in mph) (remember the HUD
expresses speed in knots, not mph). I
guess an appropriate speed to rise in the air is about 60 mph. Normal
flight speed seems about 80 mph.
It is a simpler aircraft, as it has no flaps and few instruments. This
doesn't mean it is easier or safer to fly. While you will find the
"three points" take off and landing to be quite easy in FlightGear, the
"two points"
take off and landing need serious training. You need to master these
procedures (and many others) to fly the Piper Cub securely. Worst that
can happen is you
get confident in the airplane without having been trained to the
numerous possibilities of things going bad. Then you simply won't be
able to prevent things to go bad. (And, again: you're reading a
tutorial
written by somebody who has no pilot license and who never even flew a
Piper Cub as a passenger.)
This is what I believe to be the "three points" take off. It is quite
simple to perform in FlightGear, but: a friend who is a pilot told me
he learned this procedures much later than the "two points", because in
the real world the wind makes the three points procedure difficult. It
can be performed
in FlightGear without using the rudder, which of course is not
realistic:
- You need the simplified
HUD (h h I), just to know the yoke and throttle positions.
- Fully pull the yoke backwards and keep it there.
- Throttle the engine to maximum (Page Up).
- Once
the
front wheels clearly rise from the ground, slowly push the yoke back
to
neutral,
towards a
normal flight close above the runway (the pushing takes about a lengthy
second).
- Let the plane accelerate to 60
mph, then pull the yoke and keep about 60 mph while rising
in the air.
- Once you got to 500 feet, push the yoke to stabilize.
- Keep 500 feet. This will bring the speed to about 80mph.
Meanwhile make a 180° turn to go for the landing. Fly a long time, till
the runway is a good distance behind you,
then make another 180° turn to head for the runway.
This is my favorite three points landing:
- Keep the 500 feet altitude and about 80 mph speed; don't reduce
the engine power.
- Look for some obvious ground features far to the left and to the
right of the start of the runway. You will need them shortly.
- Once the top of the yellow motor cover touches the runway start,
things become tight. Go on flying straight till the runway start is
going to match with the top of the instruments on the instruments
panel. As the instruments panel is not transparent, you cannot check
for this directly. But you can look at the ground features aside from
the runway.
- Pull the engine throttle to the minimum (Page Down). Begin
to push the yoke,
to ensure the speed won't go below 60 mph.
- Aim at the runway start with the top of the engine cover.
Meanwhile the speed will decrease from 80 mph to somewhere around 60
mph. Maybe a little more, maybe a little less, but it should stabilize
close to 60 mph, while you just keep aiming at the runway start with
the top of the yellow engine cover. You just have to "yoke" the
airplane towards the runway start, just making the top of the engine
cover match with the runway start. Don't use the throttle, just leave
the engine at minimum power.
- Once close to the runway, begin the rounding. Gently pull the
yoke. Not too much.
- Steadily pull on the yoke to keep the airplane above the runway.
The more it slows down, the more you have to pull on the yoke to keep
it from touching the runway. Best let is descend very close to the
runway. If the wheels touch the runway before the yoke is completely
pulled in, don't bother for this short touching, just pull a little
more on the yoke to rise again a few inches above the ground.
- Once the yoke is completely pulled in, the airplane will gently
fall on the runway.
- Once it rolls on the runway you can use the brakes to come to a
halt (b). The yoke must stay
pulled in completely.
Now, about what seems the "two points" take off. It more ressembles
that of a "normal"
airplane yet with
some big differences on the yoke:
- Push the left mouse button in and keep it pushed, so the mouse
now controls the rudder.
- Push the engine throttle to the maximum.
- While accelerating, more or less keep the plane aligned with the
runway using the mouse/rudder. This is the most difficult part of the
game. One tip is
to
stop aiming the rudder to say the left already when the plane just
starts to turn to the left.
- Once the plane lifts from the ground, release the left mouse
button to get in yoke mode and pilot.
- The plane will already be flying at 60 mph, so immediately gently
pull on the yoke to rise in the air and prevent the airplane to
accelerate above 60 mph. Possibly center the rudder using the 0 and Enter keys.
Then this should ressemble the "two points" landing:
- Fly at say 500 feet constant altitude and 60 mph
speed towards the runway (and
align with it). Let the engine cover eat up the runway start. The
engine
cover will hide the runway completely. To
see where the runway is, push the yoke/mouse very shortly then
stabilize again in normal flight.
- Reduce the throttle to a near
minimum and begin the dive towards the runway start. Keep 60 mph using
the yoke. Add some throttle if you are going to miss the runway edge.
- Make the rounding and pull the throttle to minimum. Do not pull
steadily on the yoke. Instead let the wheels roll on the runway
immediately.
- Once the wheels roll on the runway, push firmly on the yoke, to
its maximum. This rises the tail in the air. You would think the
propeller will
hit the runway or the airplane will tilt over and be damaged. But
everything's fine. The wings are at a strong negative angle and this
brakes the plane. (Don't push the yoke this way on other airplanes,
even if their shape seems close to that of the Piper J3 Cub. Most of
them will tumble forwards.)
- The yoke being pushed in to its maximum, push the left mouse
button and keep it pushed to go in rudder control mode. Keep the plane
more or less centered on the runway. Like for the two points take off,
to keep the airplane in the
middle of the runway using the rudder needs training. And one tip is
to
stop aiming the rudder to say the right already when the plane just
starts to turn to the right...
- Once the speed is really low (and the rudder control
stabilized),
you will see the tail begins to sink to the ground. Release the left
mouse
button to go back to yoke control. Pull the yoke
backwards completely, to the other extreme. The tail now touches the
ground and the
nose is high up. Now you can use the wheel brakes (b). (If you use the brakes
too early, the plane nose will hit the ground.)
This is a third landing procedure. It involves the fact the Piper J3
Cub is a very
lightweight airplane and it has a not too catastrophic behavior during
a stall. No idea if this is allowed, anyway it is a
standard procedure for the Flying Flea, another legendary aircraft,
which has the property to not stall at all:
- While still high in the air and already above the runway or
almost, throttle the engine
down to minimum. Slowly pull the yoke completely in while the speed
decreases; simply try to go on flying horizontally despite the speed
decreasing. This slows the
plane down to stall speed (a little less than 40 mph
airspeed).
- Once stalling, it makes a steep descent towards the ground, with
the nose high up. Keep the yoke
pulled in completely. The wings seemingly act as a parachute.
- The plane
hits the
ground and bounces on its
legendary gummy landing gear. It rolls at very low speed.
- While still
pulling the yoke in to maximum, push in the wheel brakes (key b).
How to take off and land a jet
Take off on a jet is easy but you must have fast reflexes. My favorite
toy jet on FlightGear is the A-4 Skyhawk. You get it with
the --aircraft=a4-uiuc
parameter on Linux, provided it is installed.
This is my "calm" procedure to take off:
- Ask for a red and full HUD by typing h two times. The engine throttle
indicator is the leftmost on the HUD.
- The airspeed indicator is the one labeled "KIAS" on the upper
left side of the instrument panel. You can also use the airspeed
indicator on the HUD, of course.
- Tune in 1/2 engine power.
- Keep the yoke pulled in 1/2 of its total way (picture below: the
red arrow on the right side of the vertical line in the middle of the
picture).
- It is not mandatory to use the rudder to keep on the runway. The
airplane will take off before it drifts off the runway. (For sure it is
better and more "secure" to keep in the middle of the runway. But using
the rudder can make things hectic for a beginner.)
- Once above about 160 knots, the plane rises its nose in the air.
Immediately push the yoke back to neutral or almost and stabilize at
200 knots airspeed (which makes a fair climb angle) (I've no idea
whether 200 knots is the right climb speed for a real A-4. What's more
I
suppose one should rather use the AOA (see below).).
- Retract the landing gear using key g.
- Either maintain 1/2 engine power and a speed of 200 knots to get
above the clouds, or reduce the engine power to less than 1/4 and fly
normally. (Off course you can "fly normally" with full engine power.
Great fun.)
The "nervous" take off procedure is the same but you push in full
engine power. The
plane takes off quickly and you need to settle a very steep climb angle
to keep 200 knots. Best retract the landing gear immediately.
You don't land a jet the same way you land a little propeller airplane.
My toy way to land the toy A-4, inspired by
some texts I found on the Web, is this:
- Really far from the runway, keep below 2,000 feet and get the
speed
below 200 knots. Then lower the landing gear (key G) and I deploy full flaps
(all three steps, by hitting ]
three times).
- Keep a steady altitude of about 1,000 feet and a speed of
"exactly"
150 knots. Use the mouse/yoke/elevator to tune the altitude and the
engine throttle to tune the speed. (The opposite from the Cessna.)
- Try to align with the runway.
- When do you know the dive towards the runway must begin? For this
you
need
the HUD; the full default HUD with lots of features. Look at the
picture below. When you see
the "distance" between the
red "0" lines and the runway start is 25% the distance between the red
"0"
lines
and the red "-10" dotted line, it is time to dive, aiming at the runway
start. (In the picture below, that "distance" is 64%, far too much to
start a landing.)
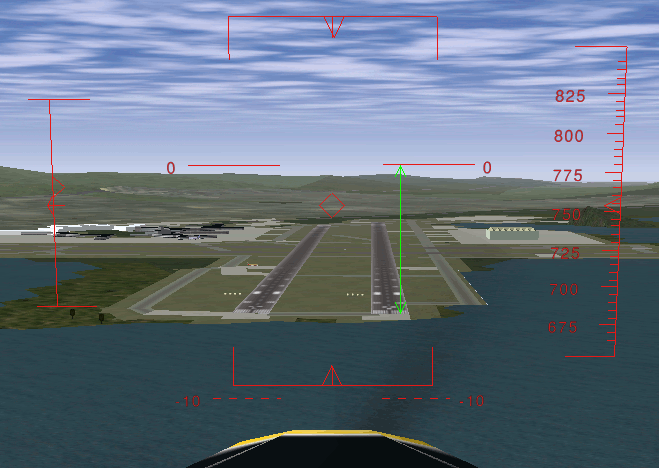
Let's explain this. The two horizontal
lines labeled "0" show the horizon line. Rather they show where the
horizon would be if the Earth was flat. When your eyes aim at those "0"
lines, you are looking horizontally. Look at the dotted
red lines labeled "-10". A feature on the ground situated there is
situated
10° below the ideal horizon. In other words: when you look to objects
"hidden"
by the lines labeled "0", you have to lower your eyes of 10° to look at
objects "hidden" by the dotted lines labeled "-10". This implies, and
it is very important, that a person in a rowboat, "hidden" by the
dotted lines labeled "-10", has to rise his eyes up 10° to look at your
plane. He sees you 10° above the horizon. In the picture above, the
start of the runway is situated at 64% of the way towards the red "-10"
dotted lines. That means you have to lower your eyes of 6.4° to look at
the runway start. This also means that if you start now to descent
towards
the runway start, the descent path will be of 6.4° (too steep). So,
the HUD allows to measure precisely the angle of the descent path. On a
jet plane you need an
angle of 2.5° (up to 3°), that is 25% of -10° (up to 30%).
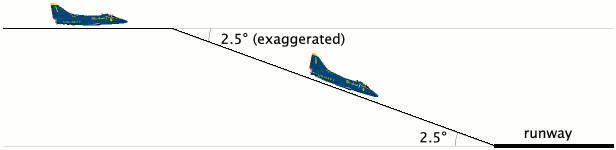
- Once descending towards the runway start, aim at it using
the yoke/mouse. And keep 150 knots speed using the engine throttle
lever.
- Keep measuring the angle between the ideal horizon and the runway
start. It must keep 2.5° (that is 25% of 10°):
- If the angle increases above 2.5°, you are above the desired
path and you must loose altitude faster. Both decrease the engine power
and dive the nose a little.
- If the angle decreases below 2.5°, you are under the desired
path. I wouldn't say you should gain altitude, rather you should loose
altitude less fast. Both add a little engine power and rise the nose a
little.
- Once very close to the runway start, do no rounding. Don't pull
steadily on the yoke like
you would for the Cessna 172p. Simply let the plane touch the
ground immediately, at high speed. Let it smash on the runway, so to
say. All three wheels almost
together. Just throttle the engine down to minimum. (If you try to
pull steadily on the yoke and hover over the
runway while the plane nose rises steadily, on a F-16 you would scrape
the plane
rear and probably destroy it.)
- Keep the key b down to
brake and use the rudder to stay aligned with the runway. Make only
very little tunings with the rudder, otherwise the plane will tumble on
one of its sides.
The HUD in a real jet contains a
symbol to show towards what the airplane is moving. It is shown in
the picture below. When you are flying at constant altitude, that
symbol is on the ideal horizon line. Once you dive towards the runway
start,
you simply have to place that symbol on the runway start. This is quite
an easy and precise way to aim at the runway start. (The
diamond in the center of the FlightGear HUD sometimes can help but it
does not have the same purpose. It shows towards what the airplane nose
is pointing. For example is you descent towards the ground at low
speed, the symbol would be somewhere on the ground while the FlightGear
diamond will be up in the sky.) (By the way, the HUD on the virtual
B-52 on FlightGear has that symbol. It is great to use while landing.)

Also, a real HUD
shows a dotted line at -2.5° to help
find the correct descend path. Simply keep that dotted line too on the
runway start.
In a real jet you don't look at the
airspeed indicator to land. Rather you look at a tool on the HUD or at
the set
of three lamps shown below. When the upper
v is
on, this means the
speed is too slow. When the lower
^ is on, the speed is too
fast. The
center
o
means the speed is OK. This indicator exists in FlightGear. On
FlightGear version 0.9.8 it seems to have wrong speeds tuned in so I
didn't use it. On FlightGear version 0.9.9 it seems OK. This
indicator does not rely on the speed itself. Rather it relies on the
AOA. That is the
Angle Of Attack, the angle at
which
the wings are pitched up against the relative airstream. There is a
close link between the AOA and the
speed. I suppose the advantage of the AOA indicator is that the optimal
AOA
does not depend on the plane load. While the speed does. By tuning the
correct AOA, always the same for every landing, you get the optimal
speed whatever the plane load. (The A-4
on FlightGear has also an AOA indicator but I don't
understand its output.)

The Cessna 172 and the A-4 Skyhawk are two extremes. Most other
airplanes are in-between these two extremes. If you trained them both
(and one or two tail wheel airplanes), you should be able to find out
how to take off and land most other airplanes.
160 knots seems an appropriate landing speed for the F-16 Falcon. Also
you
need to throttle down the engine to minimum just before the plane
should
touch the runway. Otherwise it will hover over the runway. Don't bother
for the flaps. It seems they are deployed automatically with the
landing gear. (Read the chapter about the stall).
140 up to 150 knots and all 8 flaps steps deployed seem
appropriate to land
the
virtual Boeing 737. But don't trust me especially on that one. I just
made a few experiments and didn't search for serious data. The landing
speed varies a lot depending on the plane load, I suppose 140 knots is
for a plane with no load. The Boeing 737
seems to like a gentle rounding before the wheels touch the runway.
Start the rounding early.
In the take off procedure for the Cessna 172 and the A-4 Skyhawk I
recommend you pull the yoke/mouse/elevator to
1/2 the total way, from the start on. This seems to be a bad practice
on the Pilatus PC-7. Keep the elevator
neutral. Let the plane accelerate and wait till the speed gets over 100
knots. Then pull calmly on the yoke.
During landing, deploy full flaps once you start plunging to the runway
but don't decrease the engine throttle. Decrease it only when the
hovering above the runway starts. 100 knots seems a good landing speed.
For the Cessna 310 too you better leave the elevator neutral during the
acceleration on the runway. The plane will raise its nose by its own
provided you deployed one flaps step.
(If you keep the yoke pulled from the start on, the nose will rise
sooner and you will get yawful
yaw problems.)
(Some virtual airplanes, like some big airliners or fast aircraft, need
faster physical
computations. Then add
the --model-hz=480
parameter to the command line. If the plane is difficult to control
during landings, try this.)
The angle at which you land a Cessna 172p is far steeper than the
narrow 2.5° for a jet. Nevertheless you are allowed to land the Cessna
at a narrow angle too. (Provided the terrain around the runway allows
for this, of course.) If you have passengers who
have ears problems with the variation of air pressure...
How to take off and land the P-51D Mustang
At low and medium altitude the P-51 Mustang
wasn't better than the Spitfire and
the Messerschmitts. The big difference was at high altitude. The P-51
kept efficient and maneuverable while enemy fighters were just
capable to hang in the air. This was an advantage at medium altitude
too because the P-51 was able to plunge towards enemy airplanes from
high altitude. Another key difference was the P-51 is very streamlined.
Hence it was capable to fly much further than the Spitfire. These two
differences let the P-51 Mustang fulfill its purpose: escort
Allied
bombers all the way to their targets in Germany. This allowed the
bombings to be much more efficient and contributed to the defeat of the
Nazis.
To get the The P-51D Mustang in Linux use the --aircraft=p51d
command line parameter.
This my best procedure to take off the P-51D Mustang in FlightGear:
- Deploy full flaps (]
three times) (Shift-right arrow and Shift-up arrow to check). This allows to
better see the runway.
- Pull and keep the yoke completely backwards.
- Put the yoke slightly to the right; say put the triangle just
aside of the middle line.
- Keep the left mouse button pushed so the mouse controls the
rudder.
- Put 1/3 engine throttle
(Page Up). Full throttle seems
useless.
- Let the airplane accelerate. You will have rather suddenly to
push the rudder to the right.
- Once the first signs of take-off occur,
immediately release the left mouse button to get in normal yoke control.
- Master the
airplane's attitude and push the yoke to prevent the airplane from
rising too
fast in the air. Tend to keep it close to the runway till the speed
approaches 175
mph / 150 knots.
- Once you are above 500 feet, retract the landing gear (g) and the
flaps ([).
- Decrease the engine power so just a triangle would fit between
the bottom and the triangle.
You don't need more to fly normally.
To land:
- Down the speed to 175 mph / 150 knots.
- Deploy full flaps. This is handy to better see the runway.
- Lower the landing gear (B).
- Keep the speed at about 175 mph or a little below.
- Make an approach from 500 feet altitude or higher.
- Put the rudder a triangle width aside to the right of the
middle line and keep it
there till rolling over the runway (so that a triangle would fit
between the middle line and the triangle symbolizing the rudder).
- Once
nearly above
the runway, shut the engine down completely ({ three times). (Strangely, at
minimum power the engine keeps too much power to land correctly.)
- Immediately push the yoke firmly to head the airplane towards the
runway and keep the speed not too much below 175 mph.
- Once close to the runway, gently pull the yoke to make the
rounding and
keep the plane floating close above the runway, which implies to pull
more and more
the yoke. Once the yoke is fully pulled the plane
will sink in and touch with all three wheels
together. (If you want a short landing, approach the runway at a quite
lower speed.
For a comfortable landing approach close to 175 mph.)
- Now the plane rolls over the runway, push the left mouse button
to get the mouse steer the rudder and stay in the middle of the runway.
- Since the yoke is completely pulled, you can use the brakes
immediately
(b), once the wheels touched
the runway.
Keep in mind this is not the genuine P-51D handbook.
How to take off and land the B-52 Stratofortress
The B-52F bomber implemented in FlightGear is a success. It is one of
my
favorite airplanes. I'm sorry it was conceived to terrify me. One
single B-52 bomber can wipe out every main town of my country and rise
a nightmare of sicknesses and children malformation for centuries. All
B-52 bombers united can wipe out mankind and almost every kinds of
plants and animals on Earth.
The differences between the virtual B-52F bomber and the Cessna 172p
are these:
- The B-52F starts with the flaps deployed and the parking brakes
set.
- There are only two flaps steps: retracted and deployed. When
deployed they are only meant to make the wings lift more, not to brake.
If you want to brake, you need the spoilers. They deploy on the
upper side of the wings. Use the key k
to deploy the spoilers and the key j
to retract them. There are seven steps of spoilers.
- The main landing gear of the Cessna 172p is composed of two
wheels, one on each side of the airplane. In order for these wheels to
leave and touch the ground altogether, you need to keep the wings
parallel with the ground. The main landing gear of the B-52F is
composed of a set of wheels at the front and a set of wheels at the
rear. This implies that in order for these wheels to leave and touch
the ground altogether, you need to keep the airplane body parallel with
the ground.
This is my procedure to take off the virtual B-52F:
- Push the yoke
1/3 of the total way.
- Push the engine throttle to maximum.
- Release the parking brakes (key B).
- Push down the left mouse button to control the rudder pedals and
keep the airplane on the runway.
- The whole runway length is needed till the B-52F rises from the
ground (KSFO).
- Once the B-52F leaves the ground, around 190 knots seems
appropriate to get to altitude.
- Retract the flaps and the landing gear.
To land, the B-52F's HUD offers that great airplane-shaped symbol I
talked about in the chapter about jets. So you
just have to put that symbol on the airplane threshold (a few pixels
further seems optimal) and keep the runway start 2.5° below the ideal
horizon line. 130 up to 140 knots seems a good landing speed. (Instead
of the speed you can make use of the AOA indicator displayed on the
schematic instrument panel (P).
Simply keep the AOA at 3°. I must confess I prefer to tune the speed
rather than the AOA.) If the plane gets to the runway at 130 up to 140
knots, simply "let it smash" on the runway. Otherwise, if the speed is
higher, make a rounding and a short hover. The brakes seem to be very
effective (b). They allow to
stop the B-52F on roughly the same short runway length as the Cessna
172p.
Replays of the flights are a delight. They allow to check the plane
body left the runway and landed back parallel with it. One of the
points of view is situated inside the B-52F rear turret, which allows
you
to be your own passenger and to compare what you see with what you
experienced as a passenger in airliners. The key K allows to visualize the airplane
trajectory.
April 27
To cause an accident with the B-52 do this:
- Make a steep turn with a very strong bank; the wings nearly
perpendicular to the ground.
- Try to get the plane back level. It will obey but very slowly.
You will get aware that the turn will go on for a while and that you
will turn
further than your intended flight direction.
- Do something that accelerates the stabilization on some
airplanes: push the rudder to an extreme, opposite to the current turn.
This will suddenly make the airplane drop from the sky.
What then?
Once you master the content of this tutorial, you can claim to have a
basic understanding of what steering an airplane is about. You still
lack key
knowledge and virtual training, like these:
- How to navigate
according to
the rules, charts, laws, radio
beacons and crosswinds.
- How to deal with several fuel reservoirs and their valves, pumps
and backup pumps. If two reservoirs are
located on the wings ends and you let one of them empty while the other
keeps full, you will get severe problems.
- How to deal with the failure of
every possible part of the
plane.
You probably will learn to deal with a retractable landing gear
system and with variable pitch propellers.
Go to the FlightGear documentation page for more tutorials and
reference pages: http://www.flightgear.org/docs.html
These are great tutorials to learn further:
What is a flight simulator worth to learn flying?
If you learned to fly virtually (say with this tutorial) and learned to
navigate virtually (with another tutorial), you sure got a clearer idea
of what piloting is about. You still won't be admitted at the steer of
a real airplane. If you now go for a pilot license, I guess the most
obvious obstacles will be these:
- You will have to pass a medical examination, that will determine
if you are physically and mentally apt to pilot.
- You will have to learn flight physics in much deeper details,
like
thorough
aerodynamics. You will learn
how to place the loads in an airplane to get a correct center of
gravity, the differences between flavors of petrol, how to adapt take
off and landing speed to the airplane's weight and to the altitude and
temperature, and so on. Most important is you will understand the
physics behind every safety procedure.
- You will have to learn much more detailed check lists and
procedures and how to deal with the control tower and with other pilots.
- You will need to master the turn coordination. That is
learn to coordinate rudder and ailerons movements to get smooth turns,
with the acceleration vector perpendicular to the wings. A really bad
turn coordination, with the ailerons full to one direction and the
rudder full towards the other direction, can lead to a deadly stall
and/or spin.
- You will have to train loads of different emergency situations on
a real
airplane, like landing on very short terrains with and without engine,
manage an engine failure during take off with a maximum load, and so on.
On the other hand, piloting a real airplane is supposed to be easier
than a virtual airplane on a home computer. A real airplane gives you
much more feedback,
through vibrations and noises and through force feedback from the
controls. You can instantly "feel" how the plane is behaving. Also you
get a panoramic view, while FlightGear offers you only a narrow front
view during tense moments.
The pertinence of flight simulators has been much discussed. Military
pilots spend more time in simulators than in real airplanes, which
asserts the quality of those simulators. But what is a static
simulator worth, running on a home computer with just a keyboard and a
mouse? Worst of them are those video games that look like a flight
simulator but don't reflect much of the behavior of a real airplane.
Most horrible is their "inversed yoke" that makes you pull on
the mouse or joystick to dive. Somewhat better are commercial
simulators that emulate a plane a simplified way. Their purpose is to
make things easy, to please the customer. They often have very
realistic decors and simple keyboard inputs. One of the main qualities
of FlightGear is it tries to reproduce as best as possible the physical
behavior of a real airplane. This sometimes makes things quite
frustrating but it is one of the few simulators that try to be honest
with
you.
If you train for real airplanes in a real aeroclub, you may
perform some parts of the trainings on a home computer. If the
software was not imposed to you by your instructors, always ask them to
validate the software you will use, for each training. They know how to
fly. I don't.
I wish to thank:
- Benno
Schulenberg who corrected lots of mistakes in my English in this
tutorial.
- Albert Frank who gave me key data on piloting and corrected
technical errors.
- Vassilii
Khachaturov who learned me new things about FlightGear.
- Roy Vegard Ovesen for pointing me to the official Autopilot
Pilots Guide.
- Dene Maxwell for his solution for problems under Windows Me.
- Mark Akermann and Paul Surgeon for their
remarks.
- Michael “Sam van der Mac” Maciejewski who made the translation in
Polish and converted the tutorial in usable TEX
format.
- The FlightGear mailing list users for
their
hearty
welcome.
- 4p8 webmaster my
friend Frédéric Cloth
for the web space used by this tutorial.
- John Janssen for reporting a dead link.