 Wiki Navigation
Graphical IDE Documentation
Piklab is an integrated development
environment (IDE): it provides the tools for a complete development
process: source editing and compiling, device programming, and
debugging.
It is also possible to realize these tasks independently such as programming a device with an existing hex file.
This guide is a short description of the steps to program a new PIC
device with Piklab. This description can only show the workflow for the
open available toolchains ''gputils'', ''sdcc'' and ''Jal'', because i
don't have any of the other toolchains. It is not intended to give an
explanation how to develop for PIC microcontrollers or how to learn the
assembler language.
For convenience I assume, that you succesfully installed and configured these toolchains. If not, then please read Appendix A. If you want to use an USB programmer like PICkit2 from Microchip you should first look into Appendix B.
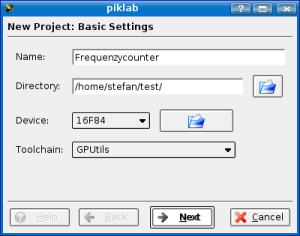
Usually, you start with creating a new project to have all source files in an easy to use and to handle package under one roof. All sourcefiles that you create in one project, will stay together and will be saved in a separate folder on your harddrive. The name of the new project is the name of the folder.
Then you can begin to edit a new source file in your project. As for coding language, you are free to choose between assembler, C-source, and Jal. You have to choose the toolchain in the lower right window, accordingly. As for programmer, you can choose ''gpsim'' if you have no real hardware yet.
Quickstart:
 After successful compilation (as seen in the Compile Log), you only have to press the Connect button to virtually connect to the GPSIM simulator and to be able to start the simulation of your program. Just press the Run button to start. After this, the Program Log shows some information output from gpsim.
 Piklab is able to autodetect the toolchain, as you can see on the picture for Assembler and Linker.
You may have to write the path of the Header Directory and the Linker Script Directory yourself. It should be similar to the screenshot.
If you press on the Details button after Detected (264), you'll get a list of supported devices of the gputils toolchain.
The Executable Directory field should normally be left blank. It is just there to define a path, in which another installation of gputils is made. It allows to try out a newer version of gputils when you can't or don't want to uninstall the system wide installation of gputils.
After the installation, you don't have to specify paths for header files or linker scripts as with the other toolchains, because support for different pic-microcontrollers is in the executable included. You can programm 16 different PIC devices with Jal in version 0.4.62. Here is the full list of them:
To have the computer automaticly recognize a connected programmer from microchip, you need to make some other changes too depending on which Linux distribution you have (how old it is). Newer distributions like Debian sid, Ubuntu6 (Dapper Drake or LTS) and some others use udev technology to detect and to connect hardware on the USB bus. On such "udev-distributions" you just need to add one file 026-microchip.rules into directory /etc/udev/rules.d/. The content of this file and a detailed description, how to make older distributions detect USB programmers can be found here: USB Port Problems
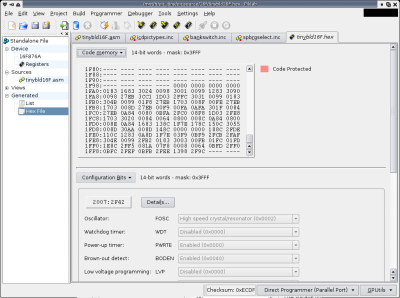
It is also possible to realize these tasks independently such as programming a device with an existing hex file.
 Workflow
This guide is a short description of the steps to program a new PIC
device with Piklab. This description can only show the workflow for the
open available toolchains ''gputils'', ''sdcc'' and ''Jal'', because i
don't have any of the other toolchains. It is not intended to give an
explanation how to develop for PIC microcontrollers or how to learn the
assembler language.For convenience I assume, that you succesfully installed and configured these toolchains. If not, then please read Appendix A. If you want to use an USB programmer like PICkit2 from Microchip you should first look into Appendix B.
Usually, you start with creating a new project to have all source files in an easy to use and to handle package under one roof. All sourcefiles that you create in one project, will stay together and will be saved in a separate folder on your harddrive. The name of the new project is the name of the folder.
Then you can begin to edit a new source file in your project. As for coding language, you are free to choose between assembler, C-source, and Jal. You have to choose the toolchain in the lower right window, accordingly. As for programmer, you can choose ''gpsim'' if you have no real hardware yet.
Quickstart:
- Start a project
- Add sourcefile(s) to this project
- Select the toolchain, processor, and programmer
- Press on the Build Project button. A hex file will be created.
- Connect the programmer by pressing on the Connect button.
- Insert a PIC microcontroller into your programmer.
- Press on buttons: Erase, Blank Check and Program.
- Press on the Verify button to check, if the hex file was written without errors into the PIC.
Start with a Project
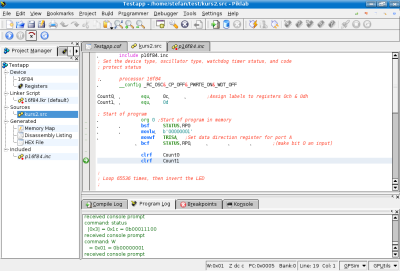
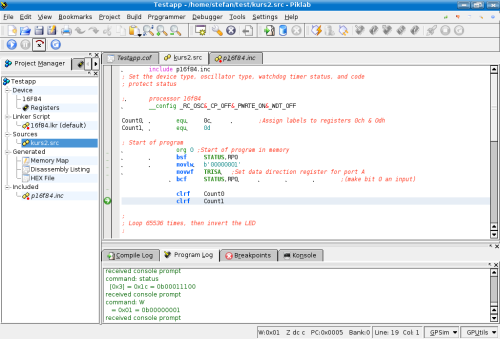
In the main window of Piklab, as you can see above, there are three areas. On the left there is the Project Window, which gives informations about all files in this project, lets you change the processor type, and allows you to open all project files. In the upper section of the main window, there is the editor window, where you can read and change source and hex files.

Programming
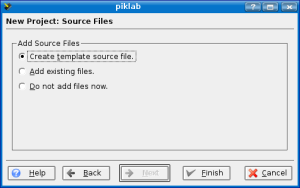
If you are not familiar with coding in assembler, you can use assembler files from the Internet. Just choose in the second dialog the radio button Add existing files.Compiling
Press on the Compile button. In the small area called Compile Log in the lower quarter of your computer screen, you can now see some messages from the compiling and linking process. There must be *successful* displayed in the last line.Simulating with gpsim
 After successful compilation (as seen in the Compile Log), you only have to press the Connect button to virtually connect to the GPSIM simulator and to be able to start the simulation of your program. Just press the Run button to start. After this, the Program Log shows some information output from gpsim.
Appendix A - Toolchains
Configuration of gputils
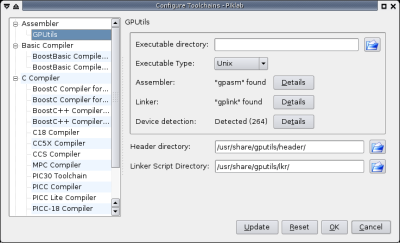
 Piklab is able to autodetect the toolchain, as you can see on the picture for Assembler and Linker.
You may have to write the path of the Header Directory and the Linker Script Directory yourself. It should be similar to the screenshot.
If you press on the Details button after Detected (264), you'll get a list of supported devices of the gputils toolchain.
The Executable Directory field should normally be left blank. It is just there to define a path, in which another installation of gputils is made. It allows to try out a newer version of gputils when you can't or don't want to uninstall the system wide installation of gputils.
Configuration of sdcc
With sdcc you are able to compile software for PIC microcontrollers in the programming language C and assembler. If your linux distribution has a package system, you can install it easily if you search in the package manager for sdcc. The version 2.6.0 is already out. You can use the same directorys for the header files and linker scripts like the gputils-toolchain, if you have it.Configuration of Jal
If you want to use Piklab with the language Jal, you probably have to compile it yourself, if it is not in the package system of your linux distribution. If you are familiar with the compilation process of software on a Linux or Unix computer with gcc, then I have a description here: Installing JalAfter the installation, you don't have to specify paths for header files or linker scripts as with the other toolchains, because support for different pic-microcontrollers is in the executable included. You can programm 16 different PIC devices with Jal in version 0.4.62. Here is the full list of them:
12C508 12C509A 12CE674 12F629 12F675
16C84 16F628 16F84 16F873 16F876
16F877 16F88 18F242 18F252 18F442 18F452
Appendix B - Hardware
How to setup an USB-programmer
To be able to use USB hardware on linux you must make sure that a library which is important for the communication is installed and that your linux kernel is compiled with usb support. libusb.so versions 0.1.8 and up are recommended. You can find out if this file is installed on your computer, if you look with your file explorer in the folder /usr/lib/ or simply let pkg-config --modversion libusb show which version of libusb is installed.To have the computer automaticly recognize a connected programmer from microchip, you need to make some other changes too depending on which Linux distribution you have (how old it is). Newer distributions like Debian sid, Ubuntu6 (Dapper Drake or LTS) and some others use udev technology to detect and to connect hardware on the USB bus. On such "udev-distributions" you just need to add one file 026-microchip.rules into directory /etc/udev/rules.d/. The content of this file and a detailed description, how to make older distributions detect USB programmers can be found here: USB Port Problems
How to setup a Parallel-programmer
If you have a programmer connected to your parallel port, you have to become the superuser root and give your user the right, to use the parallel port. This can easily be done in the System Settings in KDE. In section System Administration, click on the Users & Groups icon. Then choose Groups and click on the Administrator Mode button. In the next window, you have to type in your password and click on Ok. Then click again on Groups on the upper part of the window. In the middle of this window, you can see three buttons in a row. Modify, New, and Delete. Click on the checkbox Show systems group then click on the column where lp is and press the Modify button. Then add your username from Available Accounts to Selected Accounts, press on the Ok button and then close the next window.Appendix C - Fileformats

- *.src, *.asm, *.c, *.jal are source files.
- *.hex are text files where the assembled program is saved in a format ready to be loaded into the flash memory of the microcontroller. The Intel-Hex-Format has become a standard in the last two decades. There are different forms of intel-hex files, like INHEX8, INHEX16 and INHEX32.
- *.cod and *.cof are files containing informations for the debugger. They are created by the linker.

