EXAMPLE
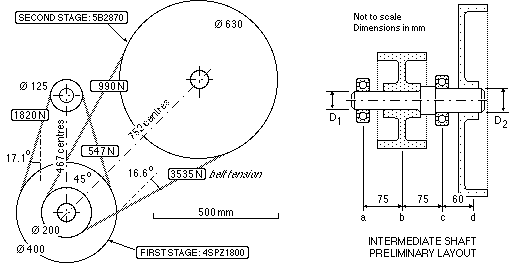
The layout of a two-stage 20 kW V-belt speed reduction is shown below. The first stage consists of a 125 mm diameter engine-driven input pulley rotating at 2400 rev/min and driving a 400 mm diameter pulley mounted on an intermediate shaft. The 200 mm diameter small pulley of the second stage is also mounted on this intermediate shaft, and drives the 630 mm diameter output pulley connected to the load. Tensions obtained from belt analyses are indicated on the sketch.
The intermediate shaft abcd has to be designed; the preliminary layout illustrated is based upon known widths of the pulleys and estimated widths of the bearing housings. The second stage small pulley is placed between the bearings as the belt loads are higher than those of the first stage, whose lesser loaded pulley is overhung. (Recall that the stresses in a simply supported beam are less when the load is situated between the supports than when it lies outside the supports.)
Select suitable diameters D1 and D2 for the intermediate shaft given that the ductile material's design stress ( σd = S/n ) is 25 MPa, a very low value to allow for unknown effects of fatigue, stress concentration due to keyways etc. ( In practice such a shaft would be designed on a fatigue basis with a smaller factor of ignorance than is used here).
The shaft design equation may be applied since there is (more than) enough information to determine the shaft loading.
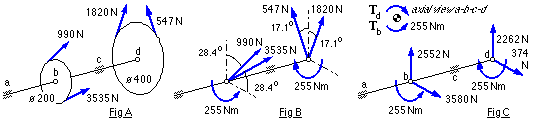
Fig A illustrates the belt tensions - pulley weights are negligible in comparison. As outlined above, each strand's tension force, F, is shifted perpendicular to its line of action to act through the shaft axis (Fig B) thus introducing a torque of magnitude F.r where r is the strand's pulley radius. When viewed from end a, the net effect of this is a 255 Nm anticlockwise torque input at pulley b, equilibrated by an equal and opposite torque extracted at the other pulley d. The corresponding power transmitted along the shaft from d to b, from first stage to second, is :
P = ωT = [ 2π (125/400) x 40 ] x 255 = 20 kW check the units!
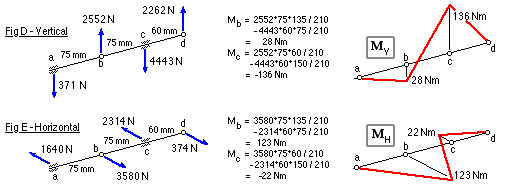
In Fig C the forces are resolved vertically and horizontally - usually this is sufficient for the calculation of bending moments via ( 12). However because the shaft is not supported at its extremities here, as is ( 12)'s model, the bearing reaction at c is first calculated then treated as a load in the application of ( 12), with the results tabulated below. The complete loading and bending moment diagrams are given for interest in Figs D and E.
The cross-section b here is analogous to section B of the stepped shaft examined above, and is analysed similarly. Section c is straightforward as there is no torque transfer in its vicinity - ie. any torque passes right through the section. So a table is set up for these two sections, and the distortion energy failure theory eg. is applied :-
| section | | b | c
|
| MV | (Nm) | 28 | 136
|
| MH | (Nm) | 123 | 22
|
| T | (Nm) | 255 | 255
|
| Me ( 11a) | (Nm) | 254 | 260
|
| Z = Me/σd | (mm3) | 10160 | 10400
|
| D = ( 32 Z/π)1/3 | (mm) | 47 | 47
|
This simplified analysis indicates 47 mm as being suitable for both diameters - there is little difference between these because the common torque is the dominating load component. Considerations other than safety might require diameters different from but not less than 47 mm because :
- further shoulders may be necessary to afford positive axial location of other components not shown
- 50 mm diameter stock might be available off-the-shelf and require no machining prior to use as the intermediate shaft
- bearings of the required load capacity might only come in diameters of 48 mm, 50 mm, etc.
- an existing pulley, suitable apart from being bored out to 50 mm diameter, may yield the cheapest solution, and so on.
The raised diameter of the shaft to the left of c has not been considered - as long as it is greater than 47 mm then it is safe. This diameter would be selected on grounds other than safety, eg. it must be large enough for positive abutment of the boss and RH bearing's inner race (considering assembly and the possibility of possible stray longitudinal forces in operation), but not too large to interfere with the bearing's outer race.
This shaft has worked out very short for its diameter, so shear effects are likely to be significant. In practice, a more rigorous analysis acknowledging fatigue would therefore be carried out for complete confidence in the design.
 Copyright 1999-2005 Douglas Wright,
doug@mech.uwa.edu.au
Copyright 1999-2005 Douglas Wright,
doug@mech.uwa.edu.au
last updated May 2005