Application of fatigue theory
Both fatigue design equations ( 19), ( 21) indicate that the capacity (the maximum continuous power transferrable) is proportional to the cube of the module - ie. a slight increase in module enables a large increase in capacity. The following examples illustrate application of the equations to analysis and to design.
EXAMPLE (analysis)
A crane traversing gearset is driven at 425 rev/min by an electric motor through primary gearing. The open gearset transmits 75 kW. The gears are manufactured to a transmission accuracy level of 5, with 8 mm module and 110 mm facewidth from through -hardened grade 1 steel, the 20 tooth pinion to 250 BHN and the 53 tooth wheel to 180 BHN. The profile shift of each gear is mid-range.
What life can be expected of the gearset at 99.9% reliability ?
The life of the pair will be the minimum life for the pinion and for the wheel due to both potential failure mechanisms - bending and contact.
Evaluating the various common factors first :
| Ka | Referring to the table of Application Factors, the input is uniform and the output rather less damaging than medium shock, so assume a value of Ka = 1.15
|
| Kv | The velocity is needed to evaluate this . . . . D1 = m.z1 = 8*20 = 160 mm, so the pitch line speed is v = πDN = π 0.160*425/60 = 3.56 m/s. Since Q =5 the corresponding dynamic factor is Kv = 1 + √v /3.6 = 1 + √3.56 /3.6 = 1.52 - which tallies with the Kv graph.
|
| Km | The geometry is known, so the parts of Km may be evaluated - f/D1 = 110/160 = 0.688 which gives a pinion proportion factor Cpf = 0.1 ∗ max( 0.5, 0.688) + max( 0, 110 - 25)/2000 - 0.025 = 0.086.
The mesh alignment factor for open gearing of this facewidth is Cma = 0.247 +110/1500 - (110/2900)2 = 0.319.
So the load distribution factor is Km = 1 +0.086 +0.319 = 1.41
|
| KR | corresponding to a reliability of 99.9% is 1.25
|
| I | Since both gears' profile shifts are mid-range, then for a ratio of 53/20 = 2.65, I = 0.119 approximately, from ( 22)
|
Apply the bending design equation ( 19) to find the life factors and hence the lives of the two gears. Calculations are shown for pinion only.
|
|
|
| pinion
| wheel
|
|
| tooth number
|
| 20
| 53
|
|
| bending strength geometry factor, J, for mid-range shifts, from (18)
|
| 0.462
| 0.423
|
|
| Brinell hardness number
|
| 250
| 180
|
|
| allowable bending stress, Sb, from diagram (grade 1)
| MPa
| 220
| 171
|
|
| KL = Ka Kv Km KR P / π m2 f N1 z1 J Sb
1.15*1.52*1.41*1.25*75 E3 / π*0.0082*0.11*(425/60)*20*0.462*220E6
Nm/s 1/m2 1/m s check units ! m2/N
| -
| 0.726
| 1.020
|
|
| corresponding life from KL plot
| Mc
| 205000
| 5.4
|
|
| dividing by rotational speed for life in units of time
| khr
| 8020!!
| 0.56
|
Apply contact design equation ( 21) in a similar manner to obtain life factors, CL, and hence the lives of the two gears in units of time.
|
|
| allowable contact stress, Sc, from diagram (grade 1)
| MPa
| 740
| 585
|
|
| CL = √( Ka Kv Km E* P / m2 f N1 I ) KR / π z1 Sc
√(1.15*1.52*1.41*113E9*75E3/0.0082*0.11*(425/60)*0.119)*1.25 / π*20*740E6
√( N/m2 Nm/s 1/m2 1/m s ) m2/N
| -
| 1.60
| 2.02
|
|
| corresponding life from CL plot
| Mc
| ??
| ??
|
The maximum possible contact life factor is 1.47 (refer to the CL graph); since the calculated values of CL for both pinion and wheel exceed this, there is no way that the desired reliabilty can be achieved with a reasonable life. Note that CL ∝ KR above, so a substantially reduced probability of survival would result in gears with non -zero lives. But the probability of the gears surviving 75 kW with an economic life is low.
This example reveals the general truism - pitting of steel gears is much more damaging than bending, ie. the life of the gearset is more often than not limited by contact fatigue. A gear's capacity is proportional to the square of its allowable surface contact stress ( 21) so that surface hardening of the tooth flanks (by case- or flame- hardening, by nitriding or carburising etc.) leads to a better balanced solution in which the contact -limited fatigue life may be increased to approach the bending -limited fatigue life. AGMA 2001 cites properties for surface -hardened steel gears - allowable contact stresses exceeding 2 GPa are possible.
EXAMPLE (synthesis)
Select suitable gears for the final stage of a commercial quality 100 kW gearbox whose input and output shafts rotate at 200 and at about 55 rev/min respectively. The box will be interposed between an electric motor and a variable density mixer, and should have a life of 16 khr with 99% reliability.
The general design approach, once materials are tentatively selected, is trial -and -error choice of tooth numbers which must satisfy the speed ratio limits and which should not be too large otherwise compactness suffers. For given tooth numbers, the necessary module and facewidth are obtainable from design equations ( 19) and ( 21).
We shall exemplify design calculations for one particular candidate z1 = 18 ( z2 = 65) and mid-range profile shifts.
An application factor of 1.25 seems appropriate, though in practice further details of the mixer's charge would enable more certainty in this choice.
From the lessons learned in the previous example, both gears will be made from grade 2 steel - the pinion will be flame hardened to 52 HRC while the wheel will be through hardened to 360 BHN. The pinion's allowable stresses must be obtained directly from AGMA 2001 - they are Sc = 1320 MPa, Sb = 380 MPa.
As contact rather than bending is expected to be critical, the gears will be designed for contact, then checked in bending.
|
|
|
| pinion
| wheel
|
|
| tooth number
| -
| 18
| 65
|
|
| allowable contact stress, Sc (grade 2)
| MPa
| 1320
| 1090
|
|
| life (16 khr*rotational speed)
| Mc
| 190
| 53
|
|
| life factor corresponding to this life, from graph, CL
| -
| 0.849
| 0.912
|
|
| product Sc CL to deduce the weaker gear
| MPa
| 1120
| 994
|
The wheel is weaker than the pinion in contact fatigue - it might pay to use a somewhat less sophisticated pinion material / heat treatment, but any decision will be delayed until all results (eg. bending too) are to hand.
The contact design equation ( 21) will now be solved to obtain an approximate idea of the module - and to this end, middle-of-the-road values will be assumed for those parameters which depend upon module for evaluation. Thus take :
- β = 12, midway between the limits of ( 16)
- Kv = 1.1 since the pinion rotates fairly slowly at 200 rev/min and so the pitch speed will be low
- Km = 1.2 since the mesh alignment factor cannot be less than 0.13 for commercial enclosed gears.
It is known that KR = 1, corresponding to a reliability of 99%, and that the contact geometry factor I = 0.127 from ( 22) corresponding to a ratio of 65/18. So applying ( 21) :-
m3 = Ka Kv Km KR2 E* P / π2 β N1 z12 I ( Sc CL )2
1.25*1.1*1.2*12*113E9*1E5 / π2*12*(200/60)*182*0.127*(994E6)2 whence m = 10.5 mm
N/m2 Nm/s s m4/N2
A standard module of either 10 or 12 mm is indicated.
A modules of m = 12 mm will be tried - this will enable factors to be tightened up when using the design equation once again, this time to evaluate the facewidth. Thus :
| Kv | D1 = m.z1 = 12*18 = 216 mm; v = πD1 N1 = π*0.216*(200/60) = 2.26 m/s (ie. very low as expected)
Assuming a transmission accuracy level of Q = 8, then, from the graph, Kv = 1.26
|
| Km | Assuming an average value of β = 9 (on the low side to offset the choice of module on the high side of the range around 10.5 mm). Then the facewidth f = 12*9 = 108, say 110 mm which leads to Cpf = 0.068; Cma = 0.194 and so Km = 1 + 0.068 + 0.194 = 1.26
|
So, solving ( 21) for the facewidth ratio, β, and for the weaker gear :
β = Ka Kv Km KR2 E* P / π2 m3 N1 z12 I ( Sc CL )2
1.25*1.26*1.26*1.02*113E9*1E5 / π2*0.0123*(200/60)*182*0.127*(994E6)2 whence β = 9.7
This is within the usual economic range 9 ≤ β ≤ 15 so looks like a practical candidate. The face width is f = 9.7*12 = 116 mm. Take f = 120 mm - sufficiently close to 110 mm to obviate need to update Km for refined calculations.
The chosen parameters so far (m = 12 mm, f = 120 mm) will now be checked via the bending equation ( 19), from which the bending lives of the two gears will be deduced, thus :
( J Sb KL ) i = Ka Kv Km KR P / π m2 f N1 z1
1.25*1.26*1.26*1.0*1E5 / π*0.0122*0.120*(200/60)*18 = 60.9 MPa
Nm/s 1/m2 1/m s
|
|
|
| pinion
| wheel
|
|
| product J Sb KL
| MPa
| 60.9
| 60.9
|
|
| bending strength - Sb, pinion from AGMA 2001; wheel corr. to 360 BHN
| MPa
| 380
| 360
|
|
| bending strength geometry factor, J, from ( 18)
| -
| 0.464
| 0.415
|
|
| KL = ( J Sb KL ) / J Sb
| -
| 0.345
| 0.408
|
It may be seen from the graph that the lives corresponding to these KL factors are very much greater than those specified, ie. bending again is less critical than contact.
Summarising, the candidate considered utilises a module of 12 mm, a facewidth of 120 mm, gears of 18 and 65 teeth with mid-range profile shifts and materials as specified above. In practice, further design candidates with various steels and heat treatments etc. would be carried out to aid an economic assessment. The program Steel Spur Gears is based on the foregoing theory and may be used to assist in the design task - a dialogue with the program for these examples is provided.
The design example adopts flame hardened teeth on the pinion, however the life of the chosen candidate is also dictated by contact. Clearly different materials and surface treatments are design variables which, together with different tooth numbers, characterise solution candidates in a real problem - and the optimum choice is mainly a question of economics. To put lives in perspective, a life of 1000 khr represents more than a century of continuous running - all day, every day!
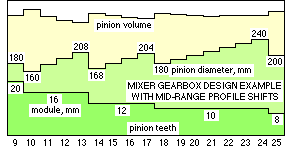
The graph shows the results of repeating the design example
 in an effort to obtain the most compact box. Trial pinion tooth numbers increasing from 9 to 25 lead to modules which decrease montonically from 20 to 8 mm, pinion diameters ( D = m*z) which generally increase and facewidths which generally decrease. The surprising outcome of this study is that pinion (and hence gearbox) volume is essentially constant over the range studied - that is small pinion tooth numbers are not necessary for compactness. However the analysis recognises only two fatigue failure modes; it ignores eg. the possibility of tooth yield due to a single large overload - a possibility which would be reduced by the larger teeth associated with small tooth numbers. AGMA 2001 is much more comprehensive than the fatigue overview given above; it caters for overloads and other eventualities, and introduces a number of additional factors which we need not examine here.
Periodic duty
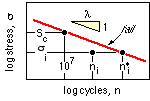
 If a component is subjected to a repeating stress of constant magnitude, σ i, then it will fail after n*i application cycles - that is its life is n*i cycles. At some stage prior to failure it will have been subjected to n i cycles, so the cumulative damage at that stage ( the fraction of its life used up ) is n i /n*i. These lives are shown here on a stress-life diagram which, in the case of steel gears and when normalised by the allowable contact stress Sc , is just the contact life factor CL examined above. It follows that for steel gears which fail by pitting :
( 23) n*i = 10 ( Sc /σ i ) λ=17.93 Mc ; σ i ≤ 1.47 Sc
The concept may be extended to a component under different stresses according to the spectrum shown below which comprises a block of n1 cycles at stress
 magnitude σ1, a block of n2 cycles at σ2, and so on. The life of the component if σ1 were applied alone is n*1 , its life under σ2 alone is n*2 etc. It follows that the fraction of life used up in the first block is n1 /n*1 , the fraction used up in the second is n2 /n*2 etc. Assuming that the stress blocks may be treated independently, failure of the component occurs when the sum of the life-fractions used up by the various blocks (the cumulative damage) reaches 100%. That is, at failure :
Σ i=1 n i /n*i = 1 Miner's Rule (strictly the 'Palmgren-Miner Rule')
This convenient but simplistic view implies that the damage caused by a stress block is constant irrespective of whether block occurred at the start of loading or just before failure. This is not the case in practice so Miner's Rule can be rather inexact, but is preferred in many non-critical applications to more complex / expensive techniques for handling variable load fatigue such as the 'Rainflow Method' popular in aeronautical circles.
EXAMPLE
| Estimate the life at 99% reliability of a steel gear under the given stress spectrum. Failure is through pitting - the allowable contact stress Sc being 1.55 GPa.
| σ i
| GPa
| 1.63
| 1.54
| 1.45
| 1.37
|
| N i
| rev/min
| 65
| 85
| 125
| 14
|
| t i
| hr
| 1
| 2
| 3
| 4
|
| If the gear's life is L (khr) then the total number of cycles in each stress block over that life is : n i = ( t i / Σt i ) L *N i
| n i
| Mc
| 0.39L
| 1.02L
| 2.25L
| 0.34L
|
| The life n*i corresponds to the stress σ i in each stress block acting alone, and follows from ( 23) :
| n*i
| Mc
| 4.1
| 11.2
| 33.1
| 91.5
|
Applying Miner's Rule : L ( 0.39/4.1 +1.02/11.2 +2.25/33.1 +0.34/91.5) = 1
whence L = 3.9 khr.
|
Many components other than gears follow approximate logarithmically linear stress-life relationships : σλi n*i = constant. Inserting this into Miner's Rule leads to :
Σ i=1 σλi . n i = constant, and = σλe Σ i=1 n i
in which σe is the equivalent stress - the single stress level which causes the same damage as the actual stress spectrum over the period of interest. Stress is usually proportional to the load raised to some index - thus for gears whch fail by pitting, the contact stresses are proportional to the square root of the tangential force and hence of the load (power or torque). Load may then be substituted for stress in the foregoing, leading to the ubiquitous relationship : loadλ * life = constant.
The life of a gear n*i due to the power in the i'th block of a periodic load spectrum can be computed using ( 21) as if the power were constant and not part of a spectrum.
All potential failure modes must be considered when applying Miner's Rule.
In conclusion, it should be reiterated that the foregoing treatment does not pretend to be a recipe for instant gear design - rather it illustrates one approach to the application of fatigue theory, and hopefully will enable the reader to specify, apply and adapt gears intelligently. Gear design is an art - gear geometry and metallurgy in particular can be subtle.
As AGMA 2001 puts it "This Standard is intended for use by the experienced gear designer capable of selecting reasonable values for the factors. It is not intended for use by the engineering public at large."
 Copyright 1999-2005 Douglas Wright,
doug@mech.uwa.edu.au
last updated May 2005
 in an effort to obtain the most compact box. Trial pinion tooth numbers increasing from 9 to 25 lead to modules which decrease montonically from 20 to 8 mm, pinion diameters ( D = m*z) which generally increase and facewidths which generally decrease. The surprising outcome of this study is that pinion (and hence gearbox) volume is essentially constant over the range studied - that is small pinion tooth numbers are not necessary for compactness. However the analysis recognises only two fatigue failure modes; it ignores eg. the possibility of tooth yield due to a single large overload - a possibility which would be reduced by the larger teeth associated with small tooth numbers. AGMA 2001 is much more comprehensive than the fatigue overview given above; it caters for overloads and other eventualities, and introduces a number of additional factors which we need not examine here.
 If a component is subjected to a repeating stress of constant magnitude, σ i, then it will fail after n*i application cycles - that is its life is n*i cycles. At some stage prior to failure it will have been subjected to n i cycles, so the cumulative damage at that stage ( the fraction of its life used up ) is n i /n*i. These lives are shown here on a stress-life diagram which, in the case of steel gears and when normalised by the allowable contact stress Sc , is just the contact life factor CL examined above. It follows that for steel gears which fail by pitting :
 magnitude σ1, a block of n2 cycles at σ2, and so on. The life of the component if σ1 were applied alone is n*1 , its life under σ2 alone is n*2 etc. It follows that the fraction of life used up in the first block is n1 /n*1 , the fraction used up in the second is n2 /n*2 etc. Assuming that the stress blocks may be treated independently, failure of the component occurs when the sum of the life-fractions used up by the various blocks (the cumulative damage) reaches 100%. That is, at failure :